Using Windows Server File Server Resource Manager (FSRM) File Screens you can block vulnerable WordPress plugins from being uploaded to your IIS web server. In the following example, you'll learn how to block WP DB Backup plugin system-wide on Windows Server, read on...
File Screening Management in Windows Server
As a seasoned Windows Server administrator you should already be familiar with File screens in File Server Resource Manager (FSRM).
If not: File screens are used to block specific types of files from being saved on a volume or in a folder tree. To specify which files to screen, you assign one or more file groups to a file screen. The File Screening Management node of File Server Resource Manager includes all the necessary options to work with file screens.
Using a file group to block specific WordPress plugin file names
In this tutorial I walk you through setting up a file screen to block the wp-db-backup.php file. This file is part of the WordPress WP DB Backup plugin. WP-DB-Backup suffers from a .sql backup enumeration vulnerability due to using guessable backup file names.
Setting up the file screen in Windows Server
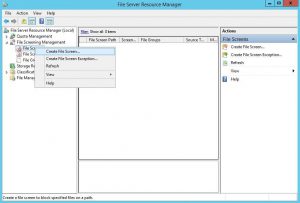
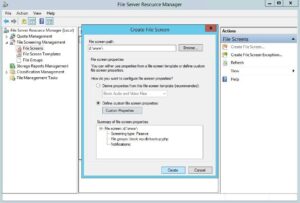
At first, in File Server Resource Manager, choose the File Screening Management option, right click and select Create File Screen.... This is where you create and edit your file screens.
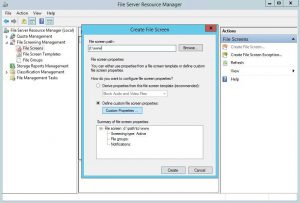
In the Create File Screen window, fill out your File screen path (e.g, the location where your websites are located), and click Custom Properties under Define custom file screen properties.
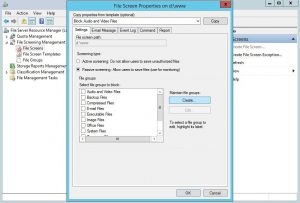
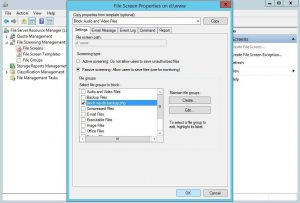
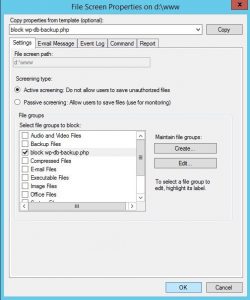
The File Screen Properties on <path> window, here we need to create a new file group, because there is no existing file group for PHP files. For testing purposes, enable Passive screening. Click Create... to create a File Group property.
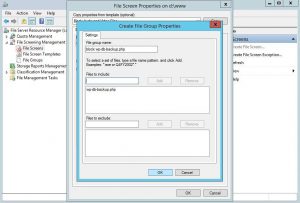
The Create File Group Properties window is where we define the files we want to disallow and block. Since this is a test, created for this post, I gave the File group an easy to remember name (block wp-db-backup.php). Fill out wp-db-backup.php under Files to include and click Add to add that file to the File Group. Leave the window by clicking OK, or add extra file names.
You are now back in the File Screen Properties on <path> window, where you see the block wp-db-backup.php File group. Select your newly created file screen, and click OK to return to the Create File Screen window.
Now, the Create File Screen window shows a confirmation of the file screen you've created. Click Create to save and enable the file screen.
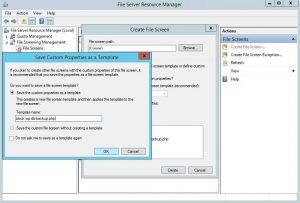
If you wish to save the properties as a file screen template you can do so in the next window that pops up. Just fill out a recognizable template name and click OK.
Now it's time for you to verify the file screen works as expected.
Test and verify the created File Screen
Testing settings is always important to make sure everything works as expected. Once your file screen is enabled, log on to your WordPress website, browse to Add Plugins and search for WP-DB-Backup. Click the Install Now button to see what happens.
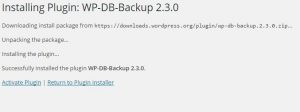
Huh?! It installed?! What happend?! Well, in this tutorial we first set the File screen to Passive screening. A passive rule is not enforced, so the wp-db-backup.php file is still allowed on our file system. If enabled, you can find an Application Event message:
User <web user> attempted to save D:\path\to\wp-content\upgrade\wp-db-backup.2.3.0-8fQS6c\wp-db-backup\wp-db-backup.php to D:\www on the SERVER NAME server. This file is in the "block wp-db-backup.php" file group, which is not permitted on the server.
The file screen we created works exactly as expected: do not permit the wp-db-backup.php, but passively and log a message when it's created. Time to enable Active screening.
Activate the Active screening and enforce the rule
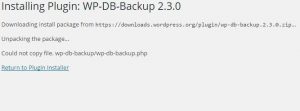
Return to your File Screen Properties for block wp-db-backup.php and select Active screening under Screening type. Click OK to activate the file screen and exit the window.
When you try to redo your steps with installing the WP-DB-Backup plugin, you are now confronted with the message Could not copy file. wp-db-backup/wp-db-backup.php
.
You now have successfully created a Windows Server File Server Resource Manager file screen, enabled the file screen and denied a file from being uploaded to your webserver's file system.
Tip: check out more File Server Resource Manager posts:
https://www.saotn.org/?s=fsrm
Conclusion blocking specific WordPress plugins on Windows Server using File Server Resource Manager
Some WordPress plugins are vulnerable to one or more vulnerabilities, whether it's SQL injection, Cross Site Scripting (XSS) or something else. When vulnerabilities aren't addressed and resolved, those plugins shouldn't be allowed to be used in a secure hosting environment.
Windows Server provides File Screens in the File Server Resource Manager to enable you to disallow and block those plugin files. In this tutorial I showed you how to set up, enable and enforce such an File Screen. This secures your WordPress site on IIS.

Thank you very much! <3 ❤️

Hi, my name is Jan. I am not a hacker, coder, developer or guru. I am merely an application manager / systems administrator, doing my daily thing at Embrace – The Human Cloud. In the past I worked at CLDIN (CLouDINfra) and Vevida. With over 20 years of experience, my specialties include Windows Server, IIS, Linux (CentOS, Debian), security, PHP, websites & optimization. I blog at https://www.saotn.org.