Set up HTTP Strict-Transport-Security (HSTS) response header in Windows Server IIS 10. Scott Hanselman wrote a great post on how to enable HTTP Strict-Transport-Security (HSTS) on IIS web servers, and here is some more technical information about HSTS in IIS, and other security headers...
Enable and serve an HTTP Strict Transport Security (HSTS) response header in IIS 10.0 and IIS 8.5
IIS 8.5 is the IIS version used in Windows Server 2012 R2, IIS 10.0 in Windows Server 2016 and up.
HTTP Strict Transport Security (HSTS) is a web security policy mechanism which is necessary to protect secure HTTPS websites against downgrade attacks, and which greatly simplifies protection against cookie hijacking.
HSTS improves security and prevents man-in-the-middle attacks, downgrade attacks, and cookie-hijacking. It allows web servers to declare that web browsers (or other complying user agents) should only interact with it using secure HTTPS connections, and never via the insecure HTTP protocol. HSTS is an IETF standards track protocol and is specified in RFC 6797.
The HSTS Policy is communicated by the server to the user agent via an HTTP response header field named Strict-Transport-Security. HSTS Policy specifies a period of time during which the user agent should only access the server in a secure fashion.
Therefore, adding a HSTS header is important after you've added SSL to your WordPress website, so browsers automatically request your HTTPS address.
Read the blog post: How to enable HTTP Strict Transport Security (HSTS) in IIS7+. Basically, all you need to add to your web.config for HSTS configuration, is an Outbound Rule, to rewrite request responses and sending the HTTP Strict Transport Security response header:
<outboundRules>
	<rule name="Add Strict-Transport-Security when HTTPS" enabled="true">
		<match serverVariable="RESPONSE_Strict_Transport_Security" pattern=".*" />
		<conditions>
			<add input="{HTTPS}" pattern="on" ignoreCase="true" />
		</conditions>
		<action type="Rewrite" value="max-age=31536000" />
	</rule>
</outboundRules>
While you're at it, don't forget to remove IIS Server header and ETag response headers.
HSTS and includeSubdomains
Do you have your SSL (TLS) certificate on your www. subdomain? Then you need to include it using includeSubdomains. The outboundRules rule then becomes:
<outboundRules>
	<rule name="Add Strict-Transport-Security when HTTPS" enabled="true">
		<match serverVariable="RESPONSE_Strict_Transport_Security" pattern=".*" />
		<conditions>
			<add input="{HTTPS}" pattern="on" ignoreCase="true" />
		</conditions>
		<action type="Rewrite" value="max-age=31536000; includeSubDomains; preload" />
	</rule>
</outboundRules>
If you include the preload flag, your site is eligible to be included in Chrome's HSTS preload list (also used by Firefox and Safari). You'll find more information about this in OWASP's HSTS HTTP Strict Transport Security examples.
HTTP Strict Transport Security (HSTS) Support in IIS 10.0 Version 1709
Starting with IIS 10.0 version 1709, you now have the option to enable HSTS and HTTP to HTTPS redirection at the web site level. Unfortunately only available to server administrators, but it's there. With the release of IIS 10.0 version 1709, HSTS is now supported natively. HSTS can be enabled at site-level by configuring the attributes of the <hsts> element under each <site> element. more details can be found in the configuration reference of HSTS Settings for a Web Site.
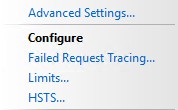
You can find the GUI elements in the Action pane, under configure you have an option HSTS….
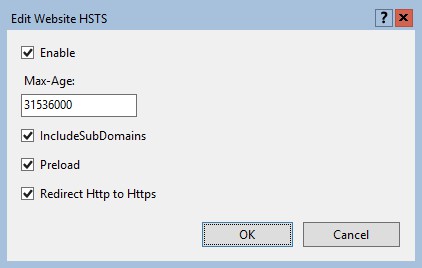
The Edit Website HSTS screen allows you to set and configure settings like max-age, includeSubdomains, Preload and Redirect HTTP to HTTPS.
Of course you are free to configure your own HTTP to HTTPS redirect in IIS. This can come in handy if you have very extensive rewrites set up. Here I have multiple examples of setting up such an redirect in IIS: How to redirect HTTP to HTTPS on IIS.
Send an HSTS header in WordPress functions.php
You can set a HSTS header in WordPress from your theme's functions.php file as well. For this to happen, you can hook into the send_headers action.
Use the following code in your functions.php to send a HSTS header from WordPress:
<?php
  add_action( 'send_headers', 'saotn_add_hsts_header' );
  function saotn_add_hsts_header() {
    header( 'Strict-Transport-Security: max-age=31536000; includeSubDomains; preload' );
  }
Do you want to know more about SSL in WordPress? See SSL in WordPress: how to move WordPress to HTTPS? The definitive guide.
More HTTP security headers
Hardening your HTTP security headers: there are a number of different HTTP response headers that need your attention:
- X-Content-Type-Options
- X-Frame-Options
- X-XSS-Protection
- Server
- Content-Security-Policy
Here are some examples for Windows Server IIS and web.config files. Please note that the examples here are exactly what they are: examples.
X-Content-Type-Options
When used with nosniff, X-Content-Type-Options tells the browser not to try to guess the Content-Type, but to respect whatever content-type header the server sends.
Add to your web.config file:
<add name="X-Content-Type-Options" value="nosniff" />X-Frame-Options
The X-Frame-Options header controls what domain a frame or iframe is allowed to load from. The value can be deny, to deny the loading of external frames, sameorigin, to only allow frames from the same domain (read: your website), and allow-from: example.com to allow frames from only a specific domain (example.com in this case).
Add to your web.config file:
<add name="X-Frame-Options" value="SAMEORIGIN" />X-XSS-Protection
X-XSS-Protection is a header that enables the browser's Cross Site Scripting filter. This makes it harder to perform Cross Site Scripting (XSS) attacks via the browser.
The header is often enabled by default in browsers, but users may choose to disable it. This header forces its activation. Add to your web.config file:
<add name="X-XSS-Protection" value="1; mode=block" />Content-Security-Policy
The Content-Security-Policy, or CSP, defines content sources which are approved and allows the browser to load them. This policy helps prevent attacks such as Cross Site Scripting (XSS) and other code injection attacks.
With HSTS, CSP may be one of the most important headers to set properly. However, there are too many directives you can use with Content-Security-Policy. Trying out a random example may render your website full with errors and thus useless.
This example below allows scripts from only the current domain (defined by 'self'):
Content-Security-Policy: script-src 'self'Use this in your web.config file:
<add name="Content-Security-Policy" value="script-src 'self';"/>The following example uses Content Security Policy (CSP) upgrade-insecure-requests instruct user agents to treat all of a site's insecure URLs (those served over HTTP) as though they have been replaced with secure URLs (those served over HTTPS).
Content-Security-Policy: upgrade-insecure-requests;In your web.config:
<add name="Content-Security-Policy" value="upgrade-insecure-requests;"/>That's all! :)

Thank you very much! <3 ❤️

Hi, my name is Jan. I am not a hacker, coder, developer or guru. I am merely an application manager / systems administrator, doing my daily thing at Embrace – The Human Cloud. In the past I worked at CLDIN (CLouDINfra) and Vevida. With over 20 years of experience, my specialties include Windows Server, IIS, Linux (CentOS, Debian), security, PHP, websites & optimization. I blog at https://www.saotn.org.

Pingback: Install IIS in Windows 11 using PowerShell
I’m curious about your first solution using outboundRules. What are the pros and cons to this vs your other page where you detail other options? Everything I’ve tried is producing a redirect loop except for this outboundRules way.
Also, if you could speak more to the options shown like “max-age” then that would be great.
Thanks!
Hi Chris, thank you for your comment!
HSTS allows you to configure your visitor’s browser to only communicate with you via HTTPS. And the
max-agedirective tells the browser how long to cache thisScott Helme has all relevant information about
max-age, and other HSTS directives in his HSTS Cheat Sheet. You might also like OWASP’s HSTS Cheat Sheet: https://www.owasp.org/index.php/HTTP_Strict_Transport_Security_Cheat_Sheet.About the Outbound Rule: unfortunately you cannot set all types of responses using web.config’s customHeaders section. In this particular case, you need to rewrite the output stream to add HSTS to the headers that are sent out.
And here lies the con; you rewrite already dynamically generated HTTP output. There may be a (small) performance penalty.
Fortunately this has changed in IIS 10.0, in Windows Server 2016. I still need to rewrite this article, but see https://docs.microsoft.com/en-us/iis/get-started/whats-new-in-iis-10-version-1709/iis-10-version-1709-hsts on how to use
customHeadersweb.config node to set the HSTS header in HTTPS responses – only in Windows Server 2016 (IIS 10.0) Version 1709, Fall Creators Update.i love u man.. thanks!!