Since Win32-OpenSSH version 8.9.1.0p1-Beta there is decent support for FIDO/U2F hardware authenticators. This means we can use a YubiKey with Windows 11 and Windows 10, w00h00! In this post, I'll show you how to install Microsoft OpenSSH client in Windows 11 and Windows 10, and how to configure your YubiKey. If you follow this guide and all goes well, you no longer need additional tools like Git Bash, openssh-sk-winhello or MremoteNG / MobaXterm.
Or: How to install Microsoft OpenSSH Client properly in Windows 11 and Windows 10 to support FIDO/U2F security keys like a YubiKey.
In this article, I'll walk you through setting up Microsoft OpenSSH for authentication with Yubico YubiKey FIDO2 security keys. Using passwordless authentication is often considered more secure than using password authentication because they use a second factor of authentication. If you follow these steps you can use your YubiKey in Windows 11.
For my environment, I'll be using a Yubico YubiKey 5C NFC with only touch/tap. See How to configure SSH with YubiKey Security Keys U2F Authentication on Ubuntu and/or Securing OpenSSH keys with hardware-based authentication (FIDO2) if you want to learn more about One Time Pads (OTP).
Install Microsoft OpenSSH client in Windows 11/10
Installing the OpenSSH client is pretty straightforward, but there are some caveats you need to be aware of. For example, earlier installed versions of OpenSSH.
First make sure no earlier versions of OpenSSH are installed on your system, for example when you used Dism, Add-WindowsCapability or installed OpenSSH manually. If a version is installed, remove it first or it'll conflict.
Second, download the OpenSSH-Win64-v8.9.1.0.msi Windows Installer file from https://github.com/PowerShell/Win32-OpenSSH/releases. Note you must have at least version V8.9.1.0p1-Beta. You can install this .msi file in two ways:
- double clicking the Windows Installer file from within Windows Explorer
msiexecfrom the (cmd / PowerShell) command line
The latter has our preference, additional steps are required if you install ssh by double clicking the installer file. If you have installed by double clicking, see Configure Path Environment section for more steps.
The OpenSSH .msi Windows Installer file can install both ssh Server and Client (the default), and only Server or only Client. We want that last one, and the command line option is ADDLOCAL=Client. By default, msiexec.exe doesn't add the installation path to your system's $env:path environment variable. For this, add ADD_PATH=1 to the command. This makes the full command to install OpenSSH Client on your system:
Start-Process
  -NoNewWindow msiexec.exe
  -ArgumentList "/i <full_path_to>\OpenSSH-Win64-v8.9.1.0.msi ADDLOCAL=Client ADD_PATH=1"
  -Wait
OpenSSH is a perfect tool for your Windows 11/10 and WSL 2 DevOps environment.
Configure Path Environment
This is only required if you have double clicked the installation .msi file.
If you don’t want to type out the full path to the ssh.exe executable file (C:\Program Files\OpenSSH\ssh.exe) constantly, add the directory to your System or User PATH environment variable. On multi-user systems, modifying the System PATH environment is recommended.
System PATH environment
As Administrator:
[Environment]::SetEnvironmentVariable(
  "Path", [Environment]::GetEnvironmentVariable(
    "Path",[System.EnvironmentVariableTarget]::Machine
  ) + ';' + ${Env:ProgramFiles} + '\OpenSSH', [System.EnvironmentVariableTarget]::Machine
)
User PATH environment
As an user you can execute:
[Environment]::SetEnvironmentVariable(
  "Path", [Environment]::GetEnvironmentVariable(
    "Path",[System.EnvironmentVariableTarget]::User
  ) + ';' + ${Env:ProgramFiles} + '\OpenSSH', [System.EnvironmentVariableTarget]::User
)
As you can see, these are complicated commands and therefor it's best/easier to just install using msiexec.exe.
Reboot
You must reboot or logout/login in order to have the new path environment variable available. I prefer to simply reboot. Continue with creating a key pair after rebooting and logging back in.
Remove OpenSSH using DISM - Bonus
If an older version of OpenSSH is installed, you can use DISM (Deployment Image Servicing and Management) or its Remove-WindowsCapability cmdlet, to remove OpenSSH Client. Use one of the following commands:
dism.exe /online /Remove-Capability /CapabilityName:OpenSSH.Client~~~~0.0.1.0Remove-WindowsCapability -Online -Name OpenSSH.Client~~~~0.0.1.0About Remove-WindowsCapability:
Uninstalls a Windows capability package from an image.
Replace "Client" with "Server" to remove a previous installed OpenSSH Server:
dism.exe /online /Remove-Capability /CapabilityName:OpenSSH.Server~~~~0.0.1.0Remove-WindowsCapability -Online -Name OpenSSH.Server~~~~0.0.1.0After successful removal you can directly start with a new installation.
Generate an OpenSSH Security Key (SK) key pair
Now it's (finally) time to generate your Security Key (sk) key pairs. Of course you have more than one YubiKey, so you always have a back-up.
Here's how:
- Enter one YubiKey into your USB-C drive. You'll notice the 'Y' logo to light up and start flickering for a second.
- Execute the following command in PowerShell (or cmd.exe), replacing the placeholders username and yubikeynumber with their respective values. For convenience, I name my keys containing the YubiKey number and creation date.
ssh-keygen.exe
  -t ecdsa-sk
  -C "username-$((Get-Date).ToString('MM-dd-yyyy'))-yubikeynumber"
  -f .ssh/id_ecdsa_sk-yubikeynumber
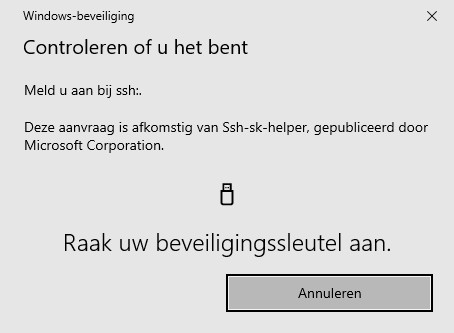
Follow the on-screen instructions and touch your YubiKey when requested.
- Switch YubiKey and execute this step again.
- You're done.
Ssh config file tweaks
Some tweaks to the stock ssh configuration file are required to ease sessions and authentication. Create or open up the .ssh\config file in notepad.exe:
notepad.exe "${env:USERPROFILE}\.ssh\config"Create the following section for your host:
Host bastionhost.example.com
  HostbasedKeyTypes sk-ecdsa-sha2-nistp256@openssh.com,sk-ssh-ed25519@openssh.com

  # Instead of HostbaseKeyTypes directive, you can also point to a ssh identity file:
  # IdentityFile c:/users/username/.ssh/id_ecdsa_sk-012345678
  # IdentityFile c:/users/username/.ssh/id_ecdsa_sk-012345679

  Compression yes
  User username
  ForwardAgent yes
Now when you type bastionhost.example.com into your shell, WinHello automatically opens a pop-up and asks you to touch your YubiKey.
Conclusion
Microsoft Win32-OpenSSH finally supports FIDO / U2F devices such as a YubiKey. This means you no longer have to rely on Git Bash alone (which is a great product btw), or Reza Tavakoli OpenSSH helper openssh-sk-winhello. Now you can have one tool, with one ssh version instead of two or sometimes even three.
Later I'll add instructions to this post how to share OpenSSH keys with WSL2, create a dedicated WSL OpenSSH config and how to use that specific WSL 2 OpenSSH config file for git usage. Making your Windows 11 and Windows 10 computer a fully fledged development station (DevOps)!

Thank you very much! <3 ❤️

Hi, my name is Jan. I am not a hacker, coder, developer or guru. I am merely an application manager / systems administrator, doing my daily thing at Embrace – The Human Cloud. In the past I worked at CLDIN (CLouDINfra) and Vevida. With over 20 years of experience, my specialties include Windows Server, IIS, Linux (CentOS, Debian), security, PHP, websites & optimization. I blog at https://www.saotn.org.

Thank you for this tutorial. There are so many things that can go wrong on Windows with OpenSSH. I had several issues:
-Uninstalling onboard OpenSSH did not work although it did not throw an error. I had to take over ownership of the files in c:\windows\system32\OpenSSH then give me rights and then delete the files. Only then I could install the newer version successfully.
-Many packages such as Perl or Python or git do come with their own version of OpenSSH. So adding OpenSSH to the path might not be enough you must bear in mind the order. The newest version should go on top.
-If you have more than one yubikey things become complicated. There is no mechanism to prompt for the right hardware key. Windows needs administrative privileges to read the list of key on a device.
-you need to specify the message authentication code with the ssh -m parameter. Without ssh -m hmac-sha2-512 user@server I do not manage to log on.
-There is an alternative method with PIV. Reading PIV certificates does not require admin rights. So one might write a script to read which key is present and try to login with the available one. But it’s again complicated. See
https://www.void.ms/perma/yubikey-als-ssh-schluessel-verwenden/247/
I kinda have the feeling this is a dead end at the moment.
Hi Robin, thank you for your extensive response, much appreciated. I must admit that I haven’t used this set up in a year, since I switched jobs, but I don’t recall having the difficulties you describe.
It is true you cannot remove the default OpenSSH version without admin privileges, and I believe things improved with more recent Windows 11 / 10 versions. I too had to take ownership of C:\Windows\System32\OpenSSH once, but that was quite some time ago.
Git for Windows offers you the option to install a bundled version of ssh.exe that comes with Git, or an external ssh.exe. Choose the latter: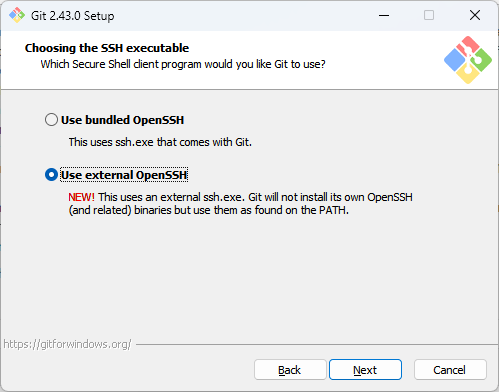 This way you are in control over the version of ssh you install, use and support.
You should also be wary about programs offering a bundled PuTTY version (mRemoteNG, MobaXterm for example). They are often bundled with an older PuTTY version. Always check the bundled PuTTY version.
I have had no issues with more than one YubiKey for OTP/FIDO2, as long as my ssh_config was correct and had them both. You should be able to use OpenSSH’s ssh_agent service in Windows, but since I started sharing my keys in WSL 2 and WSL 2 can’t use the host’s ssh_agent, I stopped using that route and added my keys to my ssh_config:
BTW, I just updated the code formatting in this post, it was all messy because of WordPress changes :\
Unfortunately I have no experience with PIV certificates. Interesting post though!
Out of interest: did you try using https://github.com/dorssel/usbipd-win to make the Yubikey available “natively” to the WSL2 VM instead of via Windows Hello? Unfortunately that would block its usage in Windows but it might make the experience in WSL2 smoother.
Hi Hans, thanks for your comment. I haven’t tried usbipd-win yet, sounds interesting and I’ll give it a spin asap.
Thank you Lars for this post. This finally helped me to get the authentication working in Windows 10.
But after getting this working, other questions came up:
– It only works if the filename of the “non-pub”-file isn’t changed from the default. If i change it like you do in the above commands, ssh isn’t asking for my key. the file must be named “id_ecdsa_sk” or “id_ed25519_sk”
i think that is very restricting. Is there a way around this?
– I have two yubikeys (for Backup Purposes). One Yubikey Neo (only ecdsa) and one Yubikey 5c (ed25519 supported). So i have two different public keys. When deploying them in my ubuntu-server and connecting with the windows openssh, it is always asking for the first key according to the first entry in the authorized_keys file on the server. To authenticate with the second yubikey i have to cancel the dialogue and acknowledge the second one that comes up with my second yubikey. I thought normal ssh key authentication wasn’t so picky.
– It seems that the config file in the .ssh folder is useless. It doesn’t matter what i configure there it seems not to be used.. Do i have to adjust some settings to the OpenSSH Client?
Sorry for all these questions but i have now nearly sunk 3 days of trial and error in this and still have many questions :(
Hi Michael, thanks for commenting.
I can only make assumptions about your setup, but here goes:
For 1 and 3: You configure the name of the key in your `.ssh/config` file, using an IdentityFile. See for example mine:
Host example.com
        IdentityFile c:/users/username/.ssh/id_ecdsa_sk_15474822
        IdentityFile c:/users/username/.ssh/id_ecdsa_sk_15474841
        Compression yes
        User my_username
        ForwardAgent yes
As you can see, I use Linux style slashes: /, and options that belong to a Host directive are indented with a tab. Indentation is not required but recommended, you may use spaces as well.
Make sure your .ssh/config file does not have an extension.
If you have the feeling .ssh/config isn’t picked up by ssh.exe when connecting, add a few -v’s for more verbose information: ssh -vvv host
That’ll show if .ssh/config is found and parsed by ssh.exe.
2. This is just how it works. The remote host is in your .ssh/known_hosts with a different key than you have set up first. In my example above, `id_ecdsa_sk_15475000` is tried first and if that one fails (perhaps it’s my backup key), then ssh.exe tries `id_ecdsa_sk_15475001`.
Thank you Jan for your quick response! Sorry for the wrong name :)
That was again the right hint. I now have found out that my config file is read. Also i have adjusted the file to my needs:
Host *
IdentityFile c:/users/username/.ssh/id_ecdsa_sk–yubi-5c-1
IdentityFile c:/users/username/.ssh/id_ecdsa_sk-yubi-neo-1
Compression yes
User root
ForwardAgent yes
Which yubikey is asked for is really decided on the client side inside this configuration file. I just made a change to the host to set it to wildcard for everything. Since i want to use this type of auth everywhere :) Just for homelab.
I also accomplished the task to get WinSCP and Kitty (Putty Clone) going with yubi-auth via Fido2.
I installed this helper-agent:
https://github.com/ndbeals/winssh-pageant
Thank you for your help.
Have a nice Day
Regards
Michael
I forgot to mention that it all works really good with a cheap NFC Reader (ACR122U).
All key generation and authentication can be done by just put the yubikey on the reader. Perfection :)
That’s great information Michael, thank you!
Thanks for your article!
I’ve tried to set this up with the “resident” option but didnt succeed. Do you have further information about this kind of setup ?
Hi Lars,
Unfortunately I don’t have any experience with resident keys on a YubiKey. The documentation mentions both local and remote systems must run at least OpenSSH version 8.3 or higher. Is that the case? See https://developers.yubico.com/SSH/Securing_SSH_with_FIDO2.html for more information.
I’m interested to hear if you got this working.
For me the issue was that authenticating using a “resident” key requires an elevated terminal when authenticating to e.g. GitHub over ssh from Windows. Not sure whether it would be possible to make that work using the forwarding from WSL2.