OpenSSH is an ideal and secure way of performing remote maintenance & administration on your servers. Even on Windows Server! :) Microsoft have released their OpenSSH port for Windows Server and Windows 10 back in 2015. Here is how to install the OpenSSH Server on Windows Server 2022, 2019 and 2016.
In this small tutorial, I'll show you how to manually install OpenSSH in Windows Server (all versions). You'll notice I'm not using PowerShell's Add-WindowsCapability cmdlet, because it errors out on unsupported platforms. And I want to be able to customize the sshd installation directory. If you follow this post, you can install Microsoft OpenSSH Server on Windows Server 2022 through even Windows Server 2012 R2, in a destination folder of your choosing. Sweet :)
Please note that a lot has changed in recent years, like Microsoft releasing .msi Windows Installer installation files, and you no longer have to rely on PowerShell Add-WindowsCapability or .zip files. Wherever possible, use the OpenSSH .msi installation option.
Want to know how to extract files from an MSI package file?
Prerequisites
In order to be able to install OpenSSH on Windows, you need the software. Doh! :-)
- Download the latest OpenSSH for Windows release from GitHub: https://github.com/PowerShell/Win32-OpenSSH/releases (OpenSSH-Win64.zip for example).
Install "Windows for OpenSSH" using PowerShell
- Unblock the downloaded OpenSSH archive if necessary:
Unblock-File .\Downloads\OpenSSH-Win64.zip - Extract the archive:
Expand-Archive .\Downloads\OpenSSH-Win64.zip -DestinationPath . - Copy the OpenSSH-Win64 folder to your desired location, e.g c:
Copy-Item -Recurse .\OpenSSH-Win64\ 'C:\' - The libcrypto.dll file has to be accessible for all users:
&icacls C:\OpenSSH-Win64\libcrypto.dll /grant Everyone:RX - Run
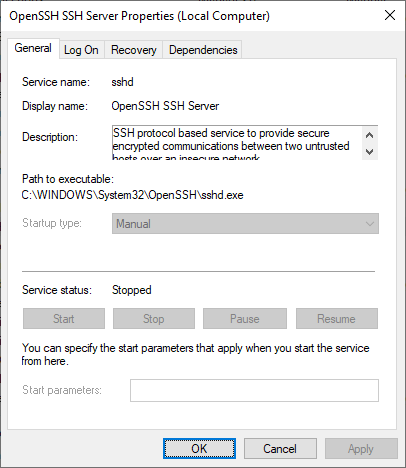
install-sshd.ps1to create the OpenSSH Authentication Agent and OpenSSH SSH Server services. It also sets some permissions and registers an Event Tracing (ETW) provider. - Change the service startup to Automatic. The OpenSSH SSH Server service is set to Manual startup, not automatic:
&sc.exe config sshd start= auto,&sc.exe config ssh-agent start= auto - Start the OpenSSH Authentication Agent and SSH Server services:
&sc.exe start sshd,&sc.exe start ssh-agent - Make sure your Windows Defender Firewall is open for port 22, rule OpenSSH-Server-In-TCP must be enabled. If this rule is not available, manually create it:
New-NetFirewallRule
  -Name sshd
  -DisplayName 'OpenSSH SSH Server'
  -Enabled True
  -Direction Inbound
  -Protocol TCP
  -Action Allow
  -LocalPort 22
  -Program "C:\Windows\System32\OpenSSH\sshd.exe"
Replace C:\Windows\System32\OpenSSH\sshd.exe with the actual path to the sshd.exe (C:\OpenSSH\sshd.exe, if you followed this instruction). Or go to Control Panel > System and Security > Windows Firewall > Advanced Settings > Inbound Rules and add a new rule for port 22.
Let's connect!
PS C:\> ssh -l janreilink localhost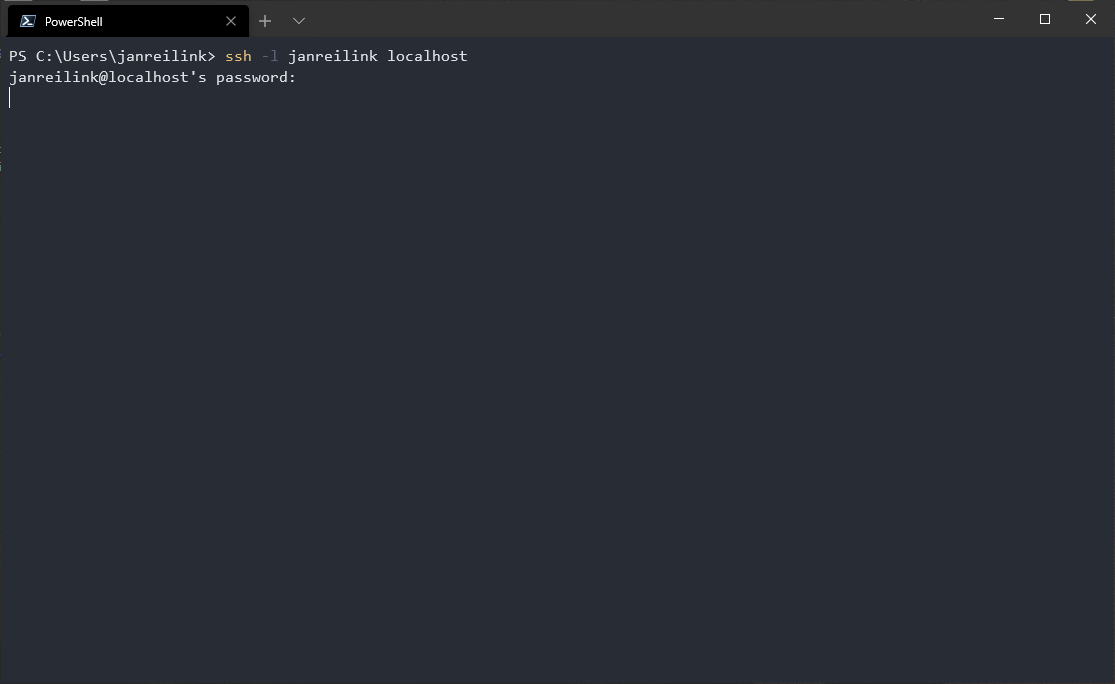
Install Win32-OpenSSH Server using MSI Installer
If you have downloaded the .msi Windows Installer MSI-file of Microsoft OpenSSH (OpenSSH-Win64-v8.9.1.0.msi for example), you can install OpenSSH server and client easily. The following command installs both OpenSSH Server and OpenSSH Client:
msiexec /i path to OpenSSH-Win64-v8.9.1.0.msiThis, however installs OpenSSH in the location C:\Program Files\OpenSSH, and doesn't update your $env:path environment variable. There are some other caveats. You can follow my guide "install Microsoft OpenSSH Client properly in Windows 11 and Windows 10 to support FIDO/U2F security keys" on Windows Server 2022 / 2019 to install and configure OpenSSH Server and Client using .msi installer files.
sshd_config
Often you not only need to install OpenSSH, you also need to configure it. For this, OpenSSH on Windows uses an mechanism where the default sshd_config (called "sshd_config_default") is located in the directory to where you've unpacked the OpenSSH-Win64.zip archive. When you start the service, the file is copied to C:\ProgramData\ssh\sshd_config.
In Windows, sshd reads configuration data from %programdata%\ssh\sshd_config by default, or a different configuration file may be specified by launching sshd.exe with the -f parameter. If the file is absent, sshd generates one with the default configuration when the service is started.
https://docs.microsoft.com/en-us/windows-server/administration/openssh/openssh_server_configuration#windows-configurations-in-sshd_config
So you can either make you configuration in the sshd_config_default file, that is copied when you start the service for the first time, or you start and stop OpenSSH, edit C:\ProgramData\ssh\sshd_config and restart OpenSSH again.
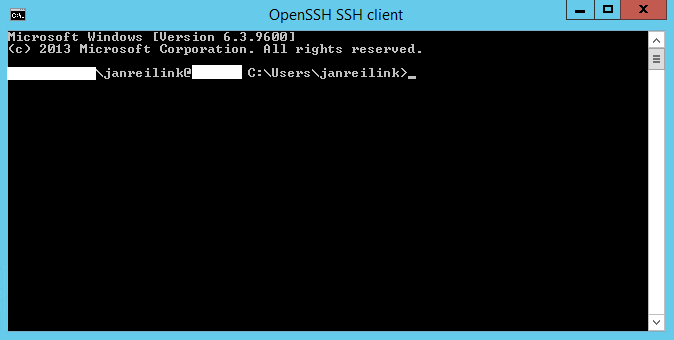
Install OpenSSH on Windows Server 2012
OpenSSH Server on Windows Server 2012 R2, you said? Yes, you can use the same method to install OpenSSH in Windows Server 2012 R2 (version 6.3.9600). Here is a screenshot of connecting to sshd on Windows version 6.3.9600:
Conclusion and giveaway
In this post I showed you how you can install OpenSSH server in various Windows Server versions, using the downloaded .zip file archive and PowerShell. You can use this approach to customize and streamline your Microsoft OpenSSH Server environment. This goes very well with SSH keys stored in Active Directory. If you want to use FIFO/U2F security keys like YubiKey in Windows OpenSSH, follow that guide.
In an other post I'll show you how to install OpenSSH Client in Windows 11 and Windows 10. Using the OpenSSH-Win64-v8.9.1.0.msi file.

Thank you very much! <3 ❤️

Hi, my name is Jan. I am not a hacker, coder, developer or guru. I am merely an application manager / systems administrator, doing my daily thing at Embrace – The Human Cloud. In the past I worked at CLDIN (CLouDINfra) and Vevida. With over 20 years of experience, my specialties include Windows Server, IIS, Linux (CentOS, Debian), security, PHP, websites & optimization. I blog at https://www.saotn.org.