In this post I describe some of the settings and changes I made to make my Windows 10 and Ubuntu WSL into a fully fledged development environment. Here are the settings and tools I use for DevOps/SysOps on Windows.
The configurations and settings I describe here make that I can use tools like git, Ansible, Visual Studio Code, Testinfra and OpenSSH connections as good as possible in my Windows 11/10 workflow. All for Infrastructure as a Service (IaaS) :).
OpenSSH
I have installed Microsoft Win32-OpenSSH (Win32 port of OpenSSH) Client for use with my Yubico YubiKey, as described in "How do I get my YubiKey to work with SSH in Windows 11 and Windows 10?". Before Win32-OpenSSH version 8.9.1.0p1-Beta I had to rely on Git Bash, which is a great tool, but made things more complicated for me (yet another ssh client installed, upgrade broke OpenSSH FIDO/U2F helper, and so on).
All ssh connections into the network need to go through a bastion host. I added a ProxyJump configuration to my Windows .ssh/config file:
Host bastionhost.example.com HostbasedKeyTypes sk-ecdsa-sha2-nistp256@openssh.com,sk-ssh-ed25519@openssh.com Compression yes User username ForwardAgent yesHost *.example.com ProxyJump bastionhost.example.com IdentityFile c:/users/username/.ssh/id_ed25519 IdentityFile /mnt/c/Users/username/.ssh/id_ed25519 User username ForwardAgent yesOnce the connection with the bastionhost is created, I can continue using regular ED25519 keys. Here you also see an IdentityFile directive pointing to my Windows .ssh/id_ed25519 file using a Linux path. That is because I share OpenSSH keys with WSL in Windows 10. Doing so there is no need for having separate key files for Windows and Linux/WSL. Or is there?
Did you know you can tunnel RDP connections through SSH? This comes in very handy if your Windows Servers are behind a firewall or bastionhost.
Linux/WSL OpenSSH config
I found that, while working with Visuals Studio Code, git and Ansible/testinfra, it sometimes is more convenient to have a separate ssh config file for Linux/WSL. For example some actions I perform have to go through a SOCKS5 proxy, and I need a ProxyCommand without breaking my current ssh configuration. So I created an additional file: .ssh/wsl_config.
The munged ProxyCommand is:
Host *.example.net
  ProxyCommand ncat.exe --proxy-type socks5 --proxy [::1]:4001 %h %p
  User username
  ForwardAgent yes
Notice the different top level domain extension ".net".
ncat.exe is the Windows netcat variant as found in nmap. You need to install this in Windows, not Linux/WSL. "Why no ProxyJump for this as well?", I hear you ask. Well, when I run Testinfra tests with ProxyJump, I have to log on (pad the YubiKey) multiple times per test. That sucks :)
To support YubiKey OTP authentication, I added the following to my .bashrc file to create an environment variable:
export SSH_SK_HELPER="/mnt/c/Program Files/OpenSSH/ssh-sk-helper.exe"And the IdentityFile directive for my private keys:
Host bastionhost.example.com
  IdentityFile /mnt/c/Users/username/.ssh/id_ecdsa_sk_1
  IdentityFile /mnt/c/Users/username/.ssh/id_ecdsa_sk_2
  Compression yes
  User username
  ForwardAgent yes
If you've added this and try to log onto bastionhost.example.com from within WSL, you notice the WinHello pop-up asking you to tap your YubiKey.
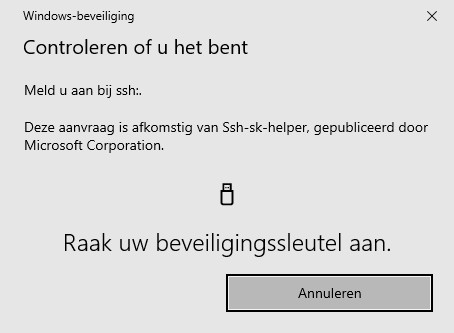
Sweet! :)
Reuse SSH connections
If you connect and disconnect a lot, for example you're git pull'ing various repos, or running Testinfra tests, might benefit from keeping a connection open and reusing it. Unfortunately OpenSSH directives like ControlMaster, ControlPath and ControlPersist are not supported in Windows. But they are in WSL.
Add to your .ssl/wsl_config file, under the Host directive it concerns:
Host bastionhost.example.com
  ControlMaster    auto
  ControlPath   ~/tmp/%r@%h:%p.sock
  ControlPersist 60s
Don't use ~/.ssh/ as your ControlPath if that folder is symlinked to Windows. For example if you share OpenSSH keys with WSL and Windows. Make sure ~/tmp exists.
ControlPersist 60s makes sure your connection will be kept open for at most 1 minute. Use ControlPersist Yes to keep it open until server will close the connection on its timeout.
Using this little piece of configuration prevents you having to touch / tap your YubiKey twenty times in a row while pulling in 20 repos or running multiple Testinfra tests, because you are reusing a single ssh connection. Neat :)
Keychain ssh-agent - Using SSH-Agent correctly in WSL 2
Partially taken from esc.sh's post Using SSH-Agent the right way in Windows 10 WSL2.
Unfortunately you cannot integrate your Windows ssh-agent into WSL, and in WSL you'll notice an agent session does not persist when you open a new terminal window. Long story short, install and use the package keychain.
sudo apt-get install keychainIf necessary, you can edit your ~/.bashrc and add:
/usr/bin/keychain -q --nogui $HOME/.ssh/id_ecdsa_sk_1
/usr/bin/keychain -q --nogui $HOME/.ssh/id_ecdsa_sk_2
source $HOME/.keychain/$HOSTNAME-sh
When using -q there is no keychain greeting when you open a new shell. Note that this may not be necessary when you use Control* directives as shown above.
OpenSSL
For various operations, for example to verify SSL/TLS certificates, test SMTP authentication over (Start)TLS connections, or to generate pseudo-random passwords, I need OpenSSL. In both Windows and WSL2 Linux.
Install OpenSSL in WSL2
Installing OpenSSL in WSL2 is just as easy as (assuming an apt distribution like Ubuntu):
sudo apt install opensslInstall OpenSSL in Windows
If your Windows system supports winget, installing OpenSSL is as easy as it is in WSL2. Just use winget:
winget search openssl
winget install ShiningLight.OpenSSL.Light

# Or winget install ShiningLight.OpenSSL, depending on which
# version / flavor you want.
#
# FireDaemon OpenSSL is now an option too:
# winget install FireDaemon.OpenSSL
No winget? No worries! Follow these steps:
- Download Win32 OpenSSL Installation Project (choose the right flavor, this is the same OpenSSL as above)
- Install OpenSSL to -fo example-
c:\OpenSSL-Win32orc:\OpenSSL-Win64, depending on the bitness
Configure your Windows OpenSSL environment
Now configure your OpenSSL environment in Windows to prevent openssl.cnf warnings.
- at the
cmd.execommand line, typeset OPENSSL_CONF=c:\OpenSSL-Win64\bin\openssl.cfg. This will fix / resolve / prevent the following error message:
WARNING: can't open config file: /usr/local/ssl/openssl.cnf
Git

My local code repos are in WSL, it's just easier. Why? Well, I started doing that since we had double colon (::) in file- and folder names in Puppet, something NTFS just won't understand. And running Testinfra tests from within Visual Studio Code requires having your repo there.
Git needs some TLC, because it has to work with your newly created WSL OpenSSH config. If you don't, git/WSL tries to use your Windows .ssh/config file, which lacks the ProxyCommand.
Add to your .bashrc file:
export GIT_SSH_COMMAND="ssh -F ~/.ssh/wsl_config"This tells git to always use this specific ssh command, and the -F argument tells ssh to use this specific config file. Neat!
Python

For Python I didn't have to make a lot of adjustments, only that I didn't want __pycache__ files everywhere / everytime. For this I added to .bashrc:
export PYTHONDONTWRITEBYTECODE=1Ansible - configure an alternate SSH config file
Ansible in Windows 11 (or Windows 10) runs in Windows Subsystem for Linux, or WSL. You can apt install ansible and you're set. Using an alternative SSH config file with Ansible is something different.
As explained earlier, in WSL I use a different ssh config file, one specific for my WSL environment. Even though this is very handy in my workflow, it does take some time and trial & error to set everything up. Using Ansible (ansible-playbook) is one of those, so here is how you can configure and use a custom ssh config file with Ansible.
Ansible can use a custom ssh config file if you configure its ANSIBLE_SSH_ARGS environment variable. Add to your ~/.bashrc:
export ANSIBLE_SSH_ARGS="-F ~/.ssh/wsl_config"This is almost the same Git GIT_SSH_COMMAND, except that this configures SSH arguments for Ansible. You can also run on your command prompt:
ANSIBLE_SSH_ARGS="-F ~/.ssh/wsl_config" ansible-playbook -i inventory/development playbooks/book.ymlTestinfra
With Testinfra you can write unit tests in Python to test actual state of your servers configured by management tools like Salt, Ansible, Puppet, Chef and so on. For use in Visual Studio Code, the path to py.test and pytest need to be known (e.g in the path environment variable):
export PATH="$PATH:~/.local/bin"If you want to run a Testinfra test from within Visual Studio Code Remote, I found I have to provide the full path to my ssh config (--ssh-config=/home/username/.ssh/wsl_config) and prefix the hosts argument with ssh:// as protocol:
py.test --ssh-config=/home/username/.ssh/wsl_config tests.py --hosts="ssh://dbserver-01.dc03.example.net" -v --sudo This took some trial and error.
CloudMonkey
cloudmonkey ☁️? is a command line interface (CLI) for Apache CloudStack. CloudMonkey can be use both as an interactive shell and as a command line tool which simplifies Apache CloudStack configuration and management.
In (regular) Linux/Ubuntu you can install CloudMonkey using snap (snap is available by default in Ubuntu 16.04 and up):
$ sudo snap install cloudmonkeyBut unfortunately, this doesn't work with WSL, as snap install fails. Luckily you can download standalone binaries and use CloudMonkey in Windows and Linux:
- https://github.com/apache/cloudstack-cloudmonkey/releases/download/6.2.0/cmk.windows.x86-64.exe
- https://github.com/apache/cloudstack-cloudmonkey/releases/download/6.2.0/cmk.linux.x86-64
and this results in:
# WSL 2
$ /bin/cmk version
Apache CloudStack ? CloudMonkey 6.2.0
# Windows
PS C:\Users\janreilink> cmk.windows.x86-64.exe
Apache CloudStack ? CloudMonkey 6.2.0
Report issues: https://github.com/apache/cloudstack-cloudmonkey/issues
(localcloud) cmk > version
Apache CloudStack ? CloudMonkey 6.2.0
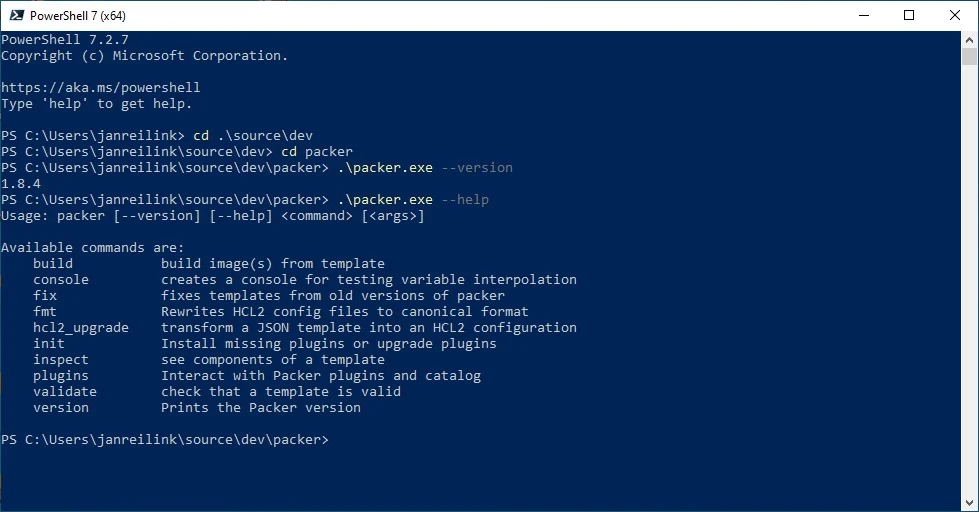
(localcloud) cmk > exitPacker
Packer, by HashiCorp, lets you create identical machine images for multiple platforms from a single source configuration. Just download the required .zip file and launch packer from your command line.
Visual Studio Code
Visual Studio Code ("VS Code") is my editor / IDE of choice. It supports remote connections to Windows Subsystem for Linux (WSL). You can easiliy open a Linux/WSL folder using the command: code . (this opens up the current folder in Visual Studio Code).
You can use \\wsl$ as UNC path in Windows to access your Linux/WSL files from Windows Explorer.
VS Code Extensions
In VS Code, I have the following extensions installed:
- Remote - WSL, or I can't connect with WSL
- Ansible
- docs-yaml
- GitLens - Git supercharged
- IIS Express (I do some dotnet/IIS stuff too sometimes - Umbraco, IIS)
- JSON Tools
- Puppet
- Pylance
- Python
- ShellCheck
- XML Tools
- YAML
Markdown text in Windows
For working with Markdown texts in Windows (creating, reading, organizing) I use both Obsidian and MarkText. Sadly, the latter seems to be no longer under active development, but be sure to check it out!
Conclusion and giveaway
In this post I showed you how you can turn Windows 11 and Windows 10 into a fully fledged development environment. It may take some getting used to, but if you're as shortcut-Ninja as I'm (I alt-tab, ctrl-c/ctrl-v a lot), you can work pretty fast in this set up. Just don't forget to run sudo apt update and sudo apt upgrade to keep Ubuntu updated.

Thank you very much! <3 ❤️

Hi, my name is Jan. I am not a hacker, coder, developer or guru. I am merely an application manager / systems administrator, doing my daily thing at Embrace – The Human Cloud. In the past I worked at CLDIN (CLouDINfra) and Vevida. With over 20 years of experience, my specialties include Windows Server, IIS, Linux (CentOS, Debian), security, PHP, websites & optimization. I blog at https://www.saotn.org.


Pingback: Create strong passwords in Windows
Pingback: Install IIS in Windows 11 using PowerShell
Pingback: Test SMTP Authentication and StartTLS
Pingback: Generate pseudo-random passwords with OpenSSL
Pingback: YubiKey support in OpenSSH for Windows 11 and Windows 10