Over time, as your Windows Server runs longer, more and more disk space is eaten. Simply gone! Investigating the disk usage leaves you clueless; there are no large log files, crash dumps, or there is no software to be removed. Where did that space go?
The answer: Windows Updates, Service Pack, and hotfix installations.
The Windows disk cleanup utility cleanmgr is not available in Windows Server 2012 if the Desktop Experience-feature is not installed. This makes cleaning up used disk space a bit harder. You can utilize your cmd.exe or PowerShell command-line, and use Deployment Image Servicing and Management (DISM) to clean up the Windows Component Store (WinSxS) in Windows Server 2012 and up.
This post also shows you how to move the Windows Server SoftwareDistribution folder and user's Documents folder to a different partition.
WinSxS cleanup in Windows Server - using DISM and PowerShell
The WinSxS folder is located in the Windows folder, for example C:\Windows\WinSxS. It’s the location for Windows Component Store files.
The Windows Component Store contains all the files that are required for a Windows installation. And, any updates to those files are also held within the component store as the updates are installed (source: KB 2795190 - and do read Manage the Component Store). The WinSxS folder will become large...
Let's clean up WinSxS!
Regain used disk space with
Deployment Image Servicing and Management (DISM)

Dism disk cleanup: Deployment Image Servicing and Management (DISM) is a command-line tool that allows you to install, uninstall, configure, and update Windows features, packages, drivers, and international settings. The /Cleanup-Image parameter of dism.exe provides advanced users more options to further reduce the size of the WinSxS folder.
The Dism.exe /Online /Cleanup-Image has a few extra parameters (or switches):
/AnalyzeComponentStore/StartComponentCleanup/ResetBasewith/StartComponentCleanup/SPSuperseded
Throughout this article, I assume you'll read help options, just add /?, like: dism.exe /Online /Cleanup-Image /?.
If you enjoyed this, you might also enjoy the following post summing up 5 extra ways to clean up disk space in Windows Server!
Analyze WinSxS folder (Component Store) with /AnalyzeComponentStore
First you can use the /AnalyzeComponentStore parameter. This analyzes the size of the Component Store in Windows. The AnalyzeComponentStore option is available in Windows 8.1 Windows Server 2012 R2, and it'll notify you whether a Component Store Cleanup is recommended or not.
dism.exe /Online /Cleanup-Image /AnalyzeComponentStore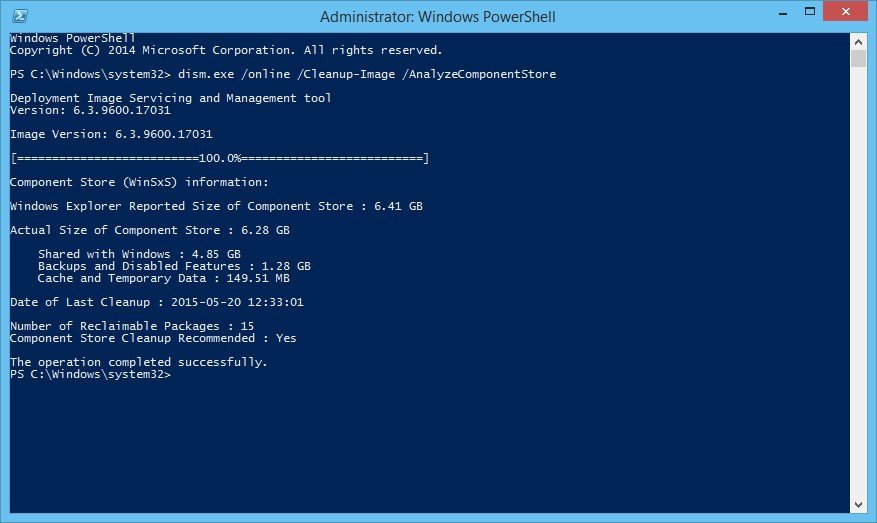
In the above image, AnalyzeComponentStore recommends a Component Store Cleanup. Let's do so.
/StartComponentCleanup parameter
Dism.exe removes superseded and unused system files from a system with the /StartComponentCleanup parameter.
dism.exe /Online /Cleanup-Image /StartComponentCleanup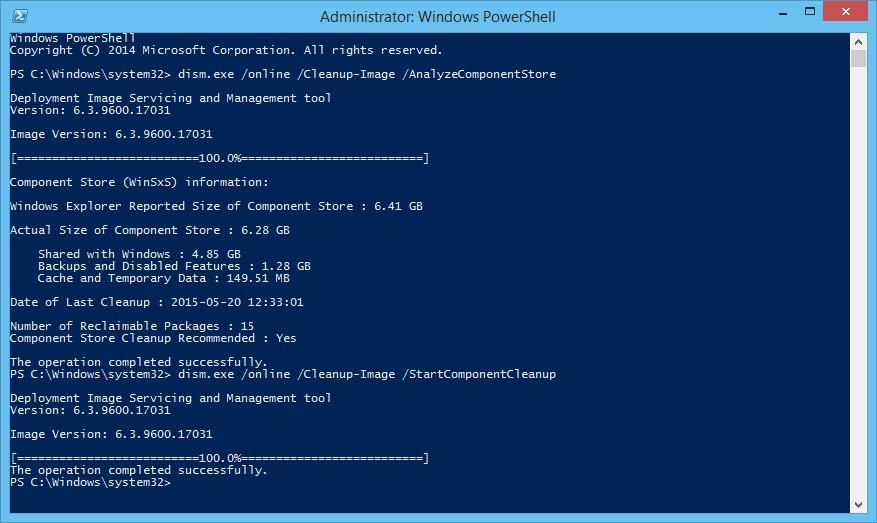
There is also a registered scheduled task called StartComponentCleanup. You can start this task from the command line:
schtasks.exe /Run /TN "\Microsoft\Windows\Servicing\StartComponentCleanup"The /StartComponentCleanup parameter is supported on Windows 8, Windows Server 2012 and up.
Using the /StartComponentCleanup parameter of Dism.exe on Windows 10 gives you similar results to running the StartComponentCleanup task in Task Scheduler, except previous versions of updated components will be immediately deleted (without a 30 day grace period) and you will not have a 1-hour timeout limitation.
From an elevated command prompt, type the following:
Dism.exe /online /Cleanup-Image /StartComponentCleanup/ResetBase switch with /StartComponentCleanup parameter
Using the /ResetBase switch with the /StartComponentCleanup parameter of dism.exe, all superseded versions of every component in the component store is removed.
Dism.exe /Online /Cleanup-Image /StartComponentCleanup /ResetBase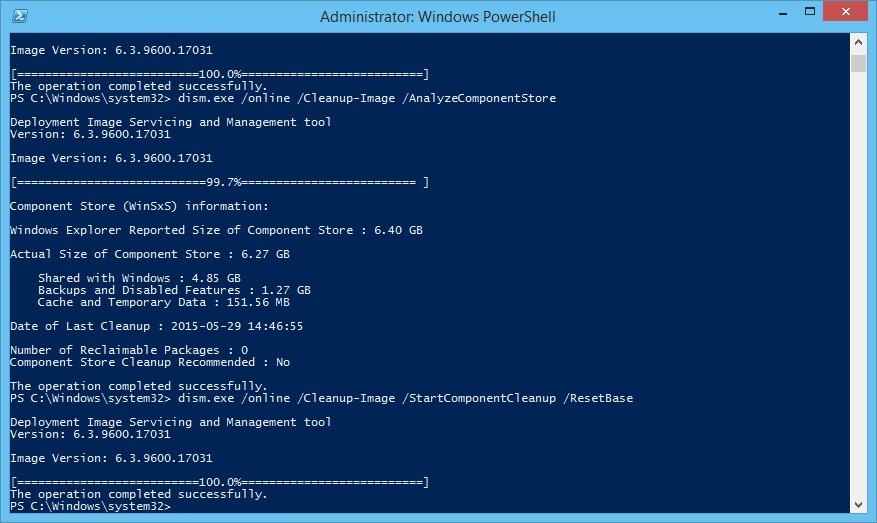
All existing service packs and updates cannot be uninstalled after this command is completed. This will not block the uninstallation of future service packs or updates.
The /ResetBase parameter is supported on Windows 8.1 and Windows Server 2012 R2.
/SPSuperseded parameter
The /SPSuperseded parameter removes any backup components needed for de-installation of a service pack. The service pack cannot be uninstalled after this command is completed.
Dism.exe /Online /Cleanup-Image /SPSupersededThe Service Pack cannot be uninstalled after this command is completed.
The /SPSuperseded parameter is supported on Windows 7 or Windows Server 2008 R2 Service Pack 1, 2012, 2012 R2.
The
/AnalyzeComponentStoreoption is available in Windows 8.1 and Windows Server 2012 R2. Use this to analyze the size of the Component Store (WinSxS folder) in Windows.
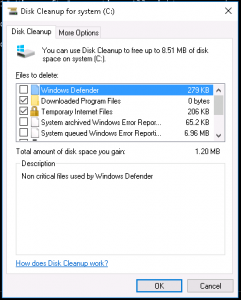
Disk Cleanup Tool is available on Windows Server 2012 but not Windows Server 2012 R2
As said at the beginning of this article, the Disk Cleanup Tool is available in Windows Server 2012, if you install the Desktop Experience-feature.
In some versions of Windows Server, you can simply copy the Disk Cleanup Tool executable cleanmgr.exe and cleanmgr.exe.mui to C:\Windows\system32 and C:\Windows\system32\en-Us from an old Windows 2008 R2 server, if you don't want to install the Desktop Experience feature.
The following steps to install (copy) cleanmgr may not work on all versions of Windows Server. Try for yourself.
Disk Cleanup Wizard addon on Windows Server 2008 R2
Microsoft KB2852386 adds a Disk Cleanup option on Windows Server 2008 R2, similar to the Windows 7 update. I've tested this on Windows Server 2012. It may not clean up everything, but at least a lot.
Here's how to make cleanmgr.exe available on Windows Server 2012 Standard (Windows version 6.2.9200), without installing the Desktop Experience feature:
Microsoft Windows [Version 6.2.9200]
(c) 2012 Microsoft Corporation. All rights reserved.

PS C:\Users\jan> $osversion = [System.Environment]::OSVersion.Version
PS C:\Users\jan> write-host $osversion
6.2.9200.0

C:\Windows\System32>cd ..

C:\Windows>copy WinSxS\amd64_microsoft-windows-cleanmgr.resources_31bf3856ad364e35_6.2.9200.16384_en-us_b6a01752226afbb3\cleanmgr.exe.mui \Windows\system32\en-US
        1 file(s) copied.

C:\Windows>copy WinSxS\amd64_microsoft-windows-cleanmgr_31bf3856ad364e35_6.2.9200.16384_none_c60dddc5e750072a\cleanmgr.exe \Windows\system32
        1 file(s) copied.

C:\Windows>system32\cleanmgr.exe

C:\Windows>
Unfortunately, this no longer works on Windows Server 2012 R2 (6.3.9600), probably due to KB2821895. As Aaron pointed out in the comments, the above solution to copy over the cleanmgr.exe and cleanmgr.exe.mui files doesn't always work well. Therefore I removed this information for Windows Server 2012 R2.
Fortunately, the Disk Cleanup functionality is back in Windows Server 2016 (at least TP5).
After cleaning up the disk, a server reboot is required. Don't forget to reboot your computer - or server - afterwards! The actual cleanup of the WinSxs directory occurs during the next reboot.
Error 0x800f0906 with DISM /Online /Cleanup-Image, PowerShell Install-WindowsFeature and SFC /scannow
Some reports are available explaining Microsoft Security Bulletin MS14-046 broke DISM /Online /Cleanup-Image /RestoreHealth, PowerShell Install-WindowsFeature with -Source parameter, and SFC /scannow. Yes, it broke a lot...
An update is made available by Microsoft: KB3005628
Update for the .NET Framework 3.5 on Windows 8, Windows 8.1, Windows Server 2012, and Windows Server 2012 R2. This update resolves an issue that prevents the optional Microsoft .NET Framework 3.5 feature from being enabled after you install security update 2966827 or 2966828 (described in Microsoft Security Bulletin MS14-046) for the Microsoft .NET Framework 3.5.
Move Windows Server SoftwareDistribution folder
Over time, your Windows Updates SoftwareDistribution folder in c:\Windows\SoftwareDistribution can become quite large, for example when multiple updates were not installed successfully.
Windows Update files are downloaded to this folder and removed after successful installation. When you find yourself in a situation where your C: partition is rather small, and SoftwareDistribution folder eats up too much disk space, follow these steps to move the SoftwareDistribution folder to a different location.
All in a cmd.exe shell (Start > Run > cmd and press enter). In this example the new location is D:\Windows-SoftwareDistribution.
- Stop the Windows Update service:
net stop wuauserv - Rename the folder
c:\Windows\SoftwareDistributiontoc:\Windows\SoftwareDistribution.old:rename c:\windows\SoftwareDistribution SoftwareDistribution.old - Create a link using Windows Sysinternals Junction, or Windows mklink
- Create the new directory:
mkdir D:\Windows-SoftwareDistribution - Create the Junction:
c:\>junction C:\Windows\SoftwareDistribution "D:\Windows-SoftwareDistribution", or:c:\>mklink /J C:\Windows\SoftwareDistribution "D:\Windows-SoftwareDistribution"
- Create the new directory:
- Restart the Windows Update Service:
net start wuauserv
When, after a while, everything seems to run and update fine, you can delete your SoftwareDistribution.old folder safely.
Move User Documents folder
Another way for you to gain some extra free space is to move the User Documents folder (and others, like Downloads), for instance from C:\Users\$USER$\Documents to D:\User\$USER$\Documents (substitute $USER$ with the username whose Documents folder you want to move). Here are the steps for you to follow (screenshots taken from Windows Server 2016 TP5):
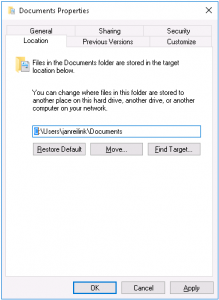
- Open Explorer and right click on the Documents folder and then Properties
- Choose Location
- Change the location where files are stored
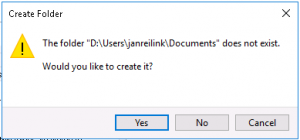
- When the destination does not exist, Windows asks to create the folder for you
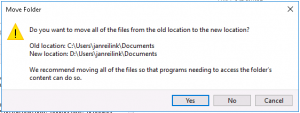
- After completion, files are moved to their new location.
Conclusion
Yes, the Windows component store (WinSxS folder) can become large, very large. But fortunately, Microsoft provides us the tools to monitor, manage and clean up the WinSxS folder to regain that used disk space.
If you are comfortable with installing the Desktop Experience Windows feature on your system, you can have the Disk Cleanup utility on your system. Otherwise, you can use the DISM (Deployment Image Servicing and Management) command for various clean up tasks.
To gain some extra free space, you can also move the Windows SoftwareDistribution folder to a different partition.

Thank you very much! <3 ❤️

Hi, my name is Jan. I am not a hacker, coder, developer or guru. I am merely an application manager / systems administrator, doing my daily thing at Embrace – The Human Cloud. In the past I worked at CLDIN (CLouDINfra) and Vevida. With over 20 years of experience, my specialties include Windows Server, IIS, Linux (CentOS, Debian), security, PHP, websites & optimization. I blog at https://www.saotn.org.

Unfortunately the /Cleanup-Image /startComponentCleanup finnishes at 100% but does nothing to the WinSXS folder size. Running /ResetBase fails.
Do you need x amount of disk space available before you run these commands?
I even ran \analyseComponentStore then\startComponentCleanup in case it needed to be run in order and then ran \AnalysecomponentStore again and there is absolutely no difference in space reclaimed.
Hi Kaygol,
The
/AnalyzeComponentStoreparameter informs you whether the component store cleanup is recommended or not. See the first image in this post.my \AnalyzeComponentStore suggested YES, to a cleanup
If you rebooted after the clean up, and it didn’t give you more free space, then I wouldn’t know and advise you to contact Microsoft.
This worked for me. Thanks!
PS C:\Windows\system32> dism.exe /Online /Cleanup-Image /AnalyzeComponentStore
Deployment Image Servicing and Management tool
Version: 6.3.9600.17031
Image Version: 6.3.9600.17031
[==========================100.0%==========================]
Component Store (WinSxS) information:
Windows Explorer Reported Size of Component Store : 35.26 GB
Actual Size of Component Store : 35.05 GB
Shared with Windows : 4.83 GB
Backups and Disabled Features : 2.71 GB
Cache and Temporary Data : 27.51 GB
Date of Last Cleanup : 2019-02-27 15:15:19
Number of Reclaimable Packages : 0
Component Store Cleanup Recommended : No
The operation completed successfully.
PS C:\Windows\system32> dism.exe /Online /Cleanup-Image /StartComponentCleanup
Deployment Image Servicing and Management tool
Version: 6.3.9600.17031
Image Version: 6.3.9600.17031
[==========================100.0%==========================]
Glad this worked fornyou Jason, thanks!
To enable RDP:
reg add “HKEY_LOCAL_MACHINE\SYSTEM\CurrentControlSet\Control\Terminal Server” /v fDenyTSConnections /t REG_DWORD /d 0 /f
To disable RDP:
reg add “HKEY_LOCAL_MACHINE\SYSTEM\CurrentControlSet\Control\Terminal Server” /v fDenyTSConnections /t REG_DWORD /d 1 /f
Jan, have you seen this error pop up before? I feel like it’s an application that is installed on the server that is preventing the action from completing. But before I go down that rabbit hole… thought I’d check if anyone knew 1) a way to isolate the applications dependent on these files and/or 2) a workaround?
DISM error 6824
the operation failed because another transaction is depending on the fact that this property will not change
Hi Kazic, thank you for your question. I haven’t encountered this error before, but have you checked your DISM log file in C:\Windows\Logs\DISM\dism.log? Unfortunately I don’t have the time now to go down the rabbit hole with you, but I’m interested in the end results. Keep me posted :)
Thanks for sharing the good article here.
Do you know where DISM keeps all it’s working files? I ran this and it failed and in the process chewed up another 3gig of my hard-drive.
Awesome to see that you found Disk Cleanup back in Server 2016. By default I assume – don’t need to add any roles/features?
Hi Fred,
I haven’t done anything special on Windows Server 2016TP5.
The information you have shared about DISM is very useful and it seems to be the simplest way to gain disk space in your system and so performance can be improved. So, thanks for sharing such a useful information.
Thank you Sneha for your comment. Seems like you like to spam www [.] diskanalyzerpro [.] com a lot in comments, so I’ve edited your comment and removed the link.
This is not my website I just wanted to give a tool for disk clean up.
Hi,
Thank you for the article. Here is my little contribution.
To see Windows Update Cleanup :
copy \\$MACHINE\C$\Windows\System32\scavengeui.dll c:\windows\System32\
copy \\$MACHINE\C$\Windows\System32\en-us\scavengeui.dll.mui c:\windows\system32\en-US\
regsvr32 c:\windows\System32\scavengeui.dll
I am not sure if this is necessary though, because after dism steps mentioned above i do not see anything to clean up anyway.
For Setup File Cleanup:
setupcln.dll
Temporary Internet Files:
ieframe.dll
Thumbnails:
thumbcache.dll
Thank you for your contribution J-cztery. I’ve planned some Win2012R2 installations for tomorrow and will give it a try.
In Server 2012 R2, it appears that while cleanmgr runs after following your directions, it becomes almost useless, because after uninstalling the desktop experience you lose all the extended cleanup options such as previous windows installations, windows update cleanup etc and even temporary files cleanup. Some sort of system hook is missing that lets it scan these system areas.
Hi Aaron, thank you very much and well noted. I’ve reflected your comment in the post.
You said “I’ve tested this on Windows Server 2012. It may not clean up everything, but at least a lot.” – I’m wondering how given trying to install the Windows6.1-KB2852386-v2-x64.msu on a Windows Server 2012 OS gives the typical error of “Not applicable to this Operating System”?
Hi Gavin, thank you for your comment!
Maybe the text isn’t clear, my apologies. What I meant is I copied the files from Windows Server 2008 R2 to Server 2012, like the Applied Innovations post explained.