The advantage of having your website content hosted on a Content Delivery Network (CDN) is having your content distributed and stored across the Globe. Utilizing the network of the Content Delivery Network provider. Hosting your WordPress website on a Content Delivery Network is an important WordPress optimization tip. Here is how to create your own Origin Pull CDN with just a few lines of PHP…
Content Delivery Network (CDN) advantages
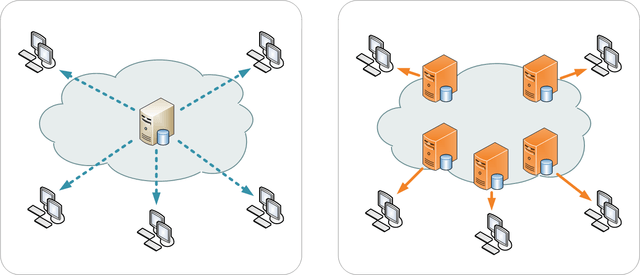
Spreading your content usually means faster downloads for visitors, because the content is physically closer (not to mention various distribution, caching and performance improvement techniques). Content Delivery Network providers usually have data-centers and servers on nearly all continents, so your content is too. Some CDN providers are for example: MaxCDN, CloudFront, Amazon S3 and Jet-Stream.
Origin Pull CDN (Content Delivery Network)
Here, an Origin Pull CDN means your content is pulled off your website upon a request by the CDN servers. You don’t have to push or upload your content to the CDN provider. Read about the differences between Origin Pull CDNs and Pull CDNs on Push Vs. Pull: The Tale of Two CDNs.
(image credits: Kanoha)
Create your own Origin Pull CDN with PHP
Improve your website performance
For small websites with not too much traffic, a CDN is pretty cheap nowadays. Only a few dollar cents per GB traffic a month.
But it is more fun to create your own CDN alternative, isn’t it? :-)
Suppose you own multiple websites with hosting packages and web space to spare. Why won’t you store content from one website on the other, to offload the content and improve the speed and performance of your website? Offloaded files are downloaded in parallel.
This article is specifically for WordPress blogs and the WP-Super-Cache plugin is required!Besides utilizing WordPress and the WP-Super-Cache plugin, you can also use IIS Outbound rewrite rules.
For this to happen, we need three files:
- a
.htaccess
file on the remote side to rewrite requests and to check if files already exist - a PHP file to store the files on the remote side
- a file to delete the files when necessary
The code in this article is provided AS-IS, is not secured or production ready! But it does work. Use at your own risk.
Note: To clarify local and remote side: Local side your main website Remote side the place you put your files for offloading, e.g. the Content Delivery Network, or CDN. This can be more than one remote website
.htaccess CDN rewrites
The .htaccess
file checks whether files already exist on this remote side and rewrites requests for files that are not yet stored there.
RewriteEngine On
RewriteCond %{REQUEST_FILENAME} !-f
RewriteCond %{REQUEST_FILENAME} !-d
RewriteCond %{REQUEST_URI} ^/wp-content/(.*) [NC]
RewriteRule .? /cacheme.php?url=/wp-content/%1 [L,QSA,R=301,NS]
Code language: Apache (apache)
The PHP Cacheme.php mechanism and file
This is the actual Origin Pull CDN mechanism.
Requests for files that not yet exist on the remote side are sent to this cacheme.php
file. It automatically creates the directory structure recursively, if it’s not yet created. We use a cURL GET to verify the requested file exists on our local side, and store the file on the remote side if it does.
Modify the following PHP code to your needs:
<?php
/**
* Yep, I host my WordPress sites on Windows IIS :)
* @Vevida (https://vevida.com), Twitter: @Jan_Reilink
*/
if( !is_dir( "d:\www\example.com\www\example.org" ) ) {
mkdir( "d:\www\example.com\www\example.org", 0755 );
}
$ogfile = $_GET['url'];
$ogserverurl = "http://www.example.org/".$ogfile;
/**
* Important PHP cURL information: dont't turn off CURLOPT_SSL_VERIFYPEER
* https://www.saotn.org/dont-turn-off-curlopt_ssl_verifypeer-fix-php-configuration/
*/
$ch = curl_init($ogserverurl);
curl_setopt( $ch, CURLOPT_NOBODY, true );
curl_exec( $ch );
$retcode = curl_getinfo( $ch, CURLINFO_HTTP_CODE );
curl_close( $ch );
if( ( $retcode === 200 ) || ( $retcode === 302 ) ) {
if( !file_exists( $ogfile ) ) {
// my Windows Server website CDN path
$path = "d:\www\example.com\www\example.org\wp-content\" . dirname( $ogfile );
if( !is_dir( $path ) ) {
mkdir( $path, 0755, true );
echo "directory created";
}
$content = file_get_contents( $ogserverurl );
file_put_contents( $ogfile, $content );
}
header( "Location: $ogserverurl" );
exit();
}
?>
Code language: PHP (php)
How to delete remote content
To delete the remote content, you can use and/or modify a PHP script like this one: Recursive Directory Delete Function. Update 2018-08-01: the lixlpixel.org URL mentioned no longer hosts the required PHP code function. Here’s an Wayback Machine archive.org link for you.
Recursive Directory Delete Function in PHP
<php
// ------------ lixlpixel recursive PHP functions -------------
// recursive_remove_directory( directory to delete, empty )
// expects path to directory and optional TRUE / FALSE to empty
// ------------------------------------------------------------
function recursive_remove_directory( $directory, $empty=FALSE )
{
if( substr( $directory, -1 ) == '/' )
{
$directory = substr( $directory, 0, -1 );
}
if( !file_exists( $directory ) || !is_dir( $directory ) )
{
return FALSE;
} elseif( is_readable( $directory ) )
{
$handle = opendir( $directory );
while ( FALSE !== ( $item = readdir( $handle ) ) )
{
if( $item != '.' && $item != '..' )
{
$path = $directory.'/'.$item;
if( is_dir( $path ) )
{
recursive_remove_directory( $path );
} else{
unlink( $path );
}
}
}
closedir( $handle );
if( $empty == FALSE )
{
if( !rmdir( $directory ) )
{
return FALSE;
}
}
}
return TRUE;
}
// ------------------------------------------------------------
?>
Code language: PHP (php)
In my test environment, I have a small locally hosted PHP script that fires an XMLHttpRequest (XHR) GET to the remote delete PHP script. This way I can fire multiple GET requests (and thus delete commands) asynchronously, to multiple websites in my Origin Pull CDN network using XMLHttpRequests. Just be creative :-)
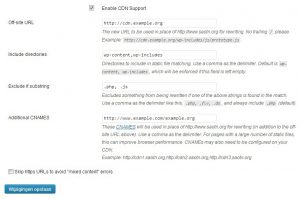
Activate your Origin Pull CDN
Log on to your WordPress Dashboard and go to the WP-Super-Cache settings. Under the “CDN” tab, configure your CDN URL with “Additional CNAMES”:
Conclusion creating a PHP based Origin Pull CDN
In this post I showed you how to create your own Origin Pull CDN (Content Delivery Network) with just a few lines of PHP code, to boost WordPress performance.
I modified the scripts and created this post to show you what you can do to improve your website performance, but also all the fun things you can do with PHP (or any other language).
For some, creating such an Origin Pull CDN with PHP might sound stupid or useless, but it’s fun to do :-)
If PHP and .htaccess files are not in your comfort zone, you can set up an Content Delivery Network (CDN) using IIS Outbound Rules. You can even create a global DNS load balancing and Varnish Cache (CDN) service on relatively cheap DigitalOcean droplets.
In this article I’ll show you how to install Varnish Cache on CentOS, version 6.7 in this case. Varnish is a web application accelerator also known as a caching HTTP reverse proxy. You install it in front of any server that speaks HTTP and configure it to cache the contents. Because Varnish Cache is really, really fast, web applications like WordPress, Drupal and Joomla can greatly benefit from Varnish Cache.
Table of Contents
show
1
Varnish Cache
2
Installing Varnish Cache on CentOS 6.7
2.1
Configure Varnish to accelerate your website
2.2
Debugging Varnish configuration issues
2.2.1
Varnish and SSL/TLS
3
Varnish administration commands
4
Conclusion installing Varnish on CentOS
Varnish Cache
As said, Varnish is a web application accelerator from which WordPress (Joomla, Drupal) performance benefits. It typically speeds up delivery with a factor of 300 – 1000x, depending on your architecture. Varnish is a caching HTTP reverse proxy. It receives requests from clients and tries to answer them from the cache. If Varnish cannot answer the request from the cache it will forward the request to the backend, fetch the response, store it in the cache and deliver it to the client.
When Varnish has a cached response ready it is typically delivered in a matter of microseconds, two orders of magnitude faster than your typical backend server, so you want to make sure to have Varnish answer as many of the requests as possible directly from the cache.
Varnish decides whether it can store the content or not based on the response it gets back from the backend. The backend can instruct Varnish to cache the content with the HTTP response header Cache-Control. There are a few conditions where Varnish will not cache, the most common one being the use of cookies. Since cookies indicates a client-specific web object, Varnish will by default not cache it.
This behaviour as most of Varnish functionality can be changed using policies written in the Varnish Configuration Language (VCL).
Installing Varnish Cache on CentOS 6.7
As with installing Elasticsearch on CentOS, installing Varnish Cache is nothing more than running a few commands. All you need to keep in mind is: Varnish relies on jemalloc which is not available in a repository. Download and install jemalloc manually:
.wp-block-code {
border: 0;
padding: 0;
}
.wp-block-code > div {
overflow: auto;
}
.shcb-language {
border: 0;
clip: rect(1px, 1px, 1px, 1px);
-webkit-clip-path: inset(50%);
clip-path: inset(50%);
height: 1px;
margin: -1px;
overflow: hidden;
padding: 0;
position: absolute;
width: 1px;
word-wrap: normal;
word-break: normal;
}
.hljs {
box-sizing: border-box;
}
.hljs.shcb-code-table {
display: table;
width: 100%;
}
.hljs.shcb-code-table > .shcb-loc {
color: inherit;
display: table-row;
width: 100%;
}
.hljs.shcb-code-table .shcb-loc > span {
display: table-cell;
}
.wp-block-code code.hljs:not(.shcb-wrap-lines) {
white-space: pre;
}
.wp-block-code code.hljs.shcb-wrap-lines {
white-space: pre-wrap;
}
.hljs.shcb-line-numbers {
border-spacing: 0;
counter-reset: line;
}
.hljs.shcb-line-numbers > .shcb-loc {
counter-increment: line;
}
.hljs.shcb-line-numbers .shcb-loc > span {
padding-left: 0.75em;
}
.hljs.shcb-line-numbers .shcb-loc::before {
border-right: 1px solid #ddd;
content: counter(line);
display: table-cell;
padding: 0 0.75em;
text-align: right;
-webkit-user-select: none;
-moz-user-select: none;
-ms-user-select: none;
user-select: none;
white-space: nowrap;
width: 1%;
}
sudo wget https://dl.fedoraproject.org/pub/epel/6/x86_64/jemalloc-3.6.0-1.el6.x86_64.rpm
Code language: Bash (bash)rpm -ivv --force jemalloc-3.6.0-1.el6.x86_64.rpm
Now it’s time to add the Varnish repository to yum, after which we can install Varnish on CentOS. Version numbers differ from the current Varnish version, as most of this came out my archives.
sudo yum update
Code language: Bash (bash)sudo yum clean all
su -
# cat << EOF >> /etc/yum.repos.d/varnish.repo
[varnish]
name=Varnish for Enterprise Linux 6
baseurl=https://repo.varnish-cache.org/redhat/varnish-4.0/el6/
enabled=1
gpgkey=https://repo.varnish-cache.org/GPG-key.txt
gpgcheck=1
EOF
yum install -y varnishCode language: Bash (bash)
And that’s it, Varnish is installed and almost ready to go!
sudo varnishd -V
Code language: Bash (bash)varnishd (varnish-4.0.3 revision b8c4a34)
Copyright (c) 2006 Verdens Gang AS
Copyright (c) 2006-2014 Varnish Software AS
See http://varnish-cache.org/releases/ and http://varnish-cache.org/releases/install_redhat.html#install-redhat for new repo URL’s and Varnish installation on Red Hat information. The above may be outdated and needs to be updated soon.
Configure Varnish to accelerate your website
The Varnish Cache daemon is configured in
/etc/sysconfig/varnish
. In my test set-up, there was no nginx running on the same server (back when I set up my global DNS load balancing and Varnish Cache CDN there was), so I chose to use an Alternative 3 configuration and to run Varnish on port 80.The most important
/etc/sysconfig/varnish
settings are:## Alternative 3, Advanced configuration
Code language: Bash (bash)#
# See varnishd(1) for more information.
#
# # Main configuration file. You probably want to change it :)
VARNISH_VCL_CONF=/etc/varnish/default.vcl
#
# # Default address and port to bind to
# # Blank address means all IPv4 and IPv6 interfaces, otherwise specify
# # a host name, an IPv4 dotted quad, or an IPv6 address in brackets.
# VARNISH_LISTEN_ADDRESS=
VARNISH_LISTEN_PORT=80
#
# # Telnet admin interface listen address and port
VARNISH_ADMIN_LISTEN_ADDRESS=127.0.0.1
VARNISH_ADMIN_LISTEN_PORT=6082
#
# # Shared secret file for admin interface
VARNISH_SECRET_FILE=/etc/varnish/secret
#
# # The minimum number of worker threads to start
VARNISH_MIN_THREADS=50
#
# # The Maximum number of worker threads to start
VARNISH_MAX_THREADS=1000
#
# # Idle timeout for worker threads
VARNISH_THREAD_TIMEOUT=120
#
# # Cache file size: in bytes, optionally using k / M / G / T suffix,
# # or in percentage of available disk space using the % suffix.
VARNISH_STORAGE_SIZE=256M
#
# # Backend storage specification
VARNISH_STORAGE="malloc,${VARNISH_STORAGE_SIZE}"
#
# # Default TTL used when the backend does not specify one
VARNISH_TTL=120
#
# # DAEMON_OPTS is used by the init script. If you add or remove options, make
# # sure you update this section, too.
DAEMON_OPTS="-a ${VARNISH_LISTEN_ADDRESS}:${VARNISH_LISTEN_PORT}
-f ${VARNISH_VCL_CONF}
-T ${VARNISH_ADMIN_LISTEN_ADDRESS}:${VARNISH_ADMIN_LISTEN_PORT}
-t ${VARNISH_TTL}
-p thread_pool_min=${VARNISH_MIN_THREADS}
-p thread_pool_max=${VARNISH_MAX_THREADS}
-p thread_pool_timeout=${VARNISH_THREAD_TIMEOUT}
-u varnish -g varnish
-S ${VARNISH_SECRET_FILE}
-s ${VARNISH_STORAGE}"
Everything left to its default except
VARNISH_LISTEN_PORT
.Varnish’ caching behavior is configured in
/etc/varnish/default.vcl
. Here, you can configure and do a lot. I went with an as minimal as possible configuration, which I can always expand when necessary.# This is an example VCL file for Varnish.
#
# It does not do anything by default, delegating control to the
# builtin VCL. The builtin VCL is called when there is no explicit
# return statement.
#
# See the VCL chapters in the Users Guide at https://www.varnish-cache.org/docs/
# and http://varnish-cache.org/trac/wiki/VCLExamples for more examples.
# Marker to tell the VCL compiler that this VCL has been adapted to the
# new 4.0 format.
vcl 4.0;
# Default backend definition. Set this to point to your content server.
backend backend01 {
.host = "203.0.113.15";
.port = "80";
}
sub vcl_recv {
set req.http.X-Forwarded-For = client.ip;
set req.backend_hint = backend01;
if (req.url ~ "(?i).(css|js|jpg|jpeg|gif|png|ico)(?.*)?quot;) {
unset req.http.Cookie;
}
# Do not cache listed file extensions
if (req.url ~ ".(zip|sql|tar|gz|tgz|bzip2|bz2|mp3|mp4|m4a|flv|ogg|swf|aiff|exe|dmg|iso|box|qcow2)") {
set req.http.X-Cacheable = "NO:nocache file";
return (pass);
}
}
sub vcl_backend_response {
# Set cached objects to expire after 1 hour instead of the default 120 seconds.
set beresp.ttl = 1h;
if (bereq.url ~ "(?i).(css|js|jpg|jpeg|gif|png|ico)(?.*)?quot;) {
unset beresp.http.set-cookie;
}
}
sub vcl_deliver {
if (obj.hits > 0) {
set resp.http.X-Cache = "HIT";
} else {
set resp.http.X-Cache = "MISS";
}
}
Code language: Bash (bash)
Once the configuration is created and saved, it’s time to start Varnish Cache:
service varnish start
. If you want to start Varnish during system boot-up, make it permanent withchkconfig
:sudo chkconfig --add varnish
Code language: Bash (bash)sudo chkconfig varnish on
Debugging Varnish configuration issues
By default, Varnish isn’t very verbose in its logging, so when the Varnish service doesn’t want to start you need to be able to debug and find the “why”. To debug Varnish’ start-up, use:
varnishd -C -f /etc/varnish/default.vcl
Code language: Bash (bash)Errors and configuration issues are printed to stdout.
Varnish and SSL/TLS
In Varnish 4.1, Varnish have added support for Willys PROXY protocol which makes it possible to communicate the extra details from a SSL-terminating proxy, such as HAProxy, to Varnish. Read the announcement for more details.
Varnish administration commands
Some administration commands for maintainging & administering Varnish are:
varnishlog
– Display Varnish logsvarnishhist
– Varnish request histogramvarnishstat
– Varnish Cache statisticsvarnishtop
– Varnish log entry rankingThey all have manual pages.
Conclusion installing Varnish on CentOS
Installing Varnish on CentOS isn’t that hard, but configuring it can be… A lot depends on the web applications you’re caching for (WordPress, Drupal, Joomla, DNN, Umbraco), and where in your HTTP pipeline you want to put Varnish: in front of a web server or next to it for content offloading.
Varnish tip: start with a minimal configuration first, and build on that.Share this post:
Share on Twitter
Share on Facebook
Share on Pinterest
Share on LinkedIn
Share on Email
Share on Reddit
Share on WhatsApp
Share on Pocket
Share on Telegram
Thanks for your post.
But now i must use Alibaba Cloud CDN. Can you help me please?
Regard
Sorry, can’t help you with that.
Thanks for your post, but i got the error, i can not use the above code, can you help me? Thank you very much
Hello minh kien, what is the error you get? The code might need some tweaking, depending on your set up of course, and unfortunately I cannot provide support for that.
Thanks for your shares, this work fine for me..!
Thank you.
Thx for the code, it helped a lot!
There is a typo in your htaccess, you added a space just before the L. It will cause an error.
Hi Antoine, thank you for your comment. I’ve removed the space, well noticed! :)
Very nice find and post WiZZarD, using outbound rewrite rules for this purpose :) Next time mod_proxy/mod_cache?