
Hardware-Backed Security: While traditional SSH keys are a step up from passwords, they are still just files on a disk. This guide explores how to leverage FIDO2/U2F hardware security keys (like the YubiKey) within OpenSSH for Windows. By moving the private key to a physical device, you ensure that authentication requires both something you know and something you physically possess, providing a robust defense against credential theft. In an era of hybrid work and sophisticated lateral movement, this transition from file-based to hardware-based identity is a critical upgrade for any Windows-centric infrastructure.
Since Win32-OpenSSH version 8.9.1.0p1-Beta there is decent support for FIDO/U2F hardware authenticators. This means we can use a YubiKey with Windows 11 and Windows 10, w00h00! In this post, you will learn how to install Microsoft OpenSSH client in Windows 11 and Windows 10, and how to configure your YubiKey. If you follow this guide and all goes well, you no longer need additional tools like Git Bash, openssh-sk-winhello or MremoteNG / MobaXterm.
In this article, I’ll walk you through setting up Microsoft OpenSSH for authentication with Yubico YubiKey FIDO2 security keys. Using passwordless authentication is often considered more secure than using password authentication because they use a second factor of authentication. If you follow these steps you can use your YubiKey in Windows 11.
For my environment, I’ll be using a Yubico YubiKey 5C NFC with only touch/tap. See How to configure SSH with YubiKey Security Keys U2F Authentication on Ubuntu and/or Securing OpenSSH keys with hardware-based authentication (FIDO2) if you want to learn more about One Time Pads (OTP).
Do you also get confused about where the private key actually “lives” when using a YubiKey? This simple diagram shows the private key never actually leaves the hardware. Neat! 🙂
graph TD
    subgraph Workstation [Windows 11 Workstation]
        A[SSH Client]
        B[Windows OpenSSH Agent]
        C[YubiKey / FIDO2 Device]
    end

    subgraph Server [Remote Server]
        D[OpenSSH Service]
        E[AuthorizedKeys File]
    end

    A <--> B
    B -- "Hardware Challenge" --> C
    C -- "Signed Response" --> B
    B -- "Encrypted Handshake" --> D
    D <--> E

    style C fill:#0078d4,color:#fff,stroke:#333
    style E fill:#f9f,stroke:#333
The benefit of FIDO2 over traditional SSH keys
A YubiKey can integrate with Windows Hello through the FIDO2/WebAuthn stack or smart-card/PIV mode, enabling hardware-backed authentication tied to the Windows security subsystem. In this model, Windows Hello acts as the local user verification layer (PIN/biometric) while the YubiKey performs cryptographic signing using its secure element, allowing passwordless or multi-factor authentication for Windows logon, enterprise identity providers, and SSH/FIDO2 authentication flows.
One of the greatest benefits of FIDO2 on Windows 11 is the seamless integration with Windows Hello. When you touch your YubiKey, Windows can leverage your existing biometric or PIN sign-in to authorize the hardware challenge.
For all this you need:
- a YubiKey (I use a Yubico YubiKey 5C NFC)
- OpenSSH Client available in Windows.
But why would you want to use FIDO2 (YubiKey) instead of traditional ssh keys for authentication? The following table lists some “Pros vs. Cons” comparing traditional file-based keys vs. YubiKey/FIDO2 keys.
Comparison: hardware-backed vs. file-based keys
| Feature | Traditional SSH Keys (ed25517) | YubiKey / FIDO2 Keys |
| Storage | Stored as a file on your disk. | Private key stays inside the hardware. |
| Portability | Easy to copy/move (high risk). | Physical device required (secure). |
| MFA Factor | Something you have (the file). | Something you have + know (PIN). |
| Theft Risk | Can be stolen via malware/backups. | Immune to remote theft or cloning. |
| Setup Ease | One command (ssh-keygen). | Requires hardware & specific drivers. |
| Ease of Use | Transparent after unlock. | Requires physical “touch” to authorize. |
Always generate a backup hardware key or have a secure ‘break-glass’ SSH key stored in a safe. If you lose your only YubiKey, you could be locked out of your infrastructure!
Traditional keys are excellent for automated server-to-server tasks (CI/CD, cron jobs) where no human is present to touch a button. However, for administrative access from a workstation, YubiKey/FIDO2 is the gold standard because it effectively eliminates the risk of “pass-the-key” attacks.
How it works: the authentication flow
Here is a sequence diagram outlining a clear visual of the “magic” happening between the hardware and the OS:
sequenceDiagram
    autonumber
    participant User
    participant App as SSH Client (Win 11)
    participant Agent as ssh-agent Service
    participant Yubi as YubiKey (FIDO2)
    participant Server as Remote Server

    User->>App: ssh user@server
    App->>Agent: Request signature
    Agent->>Yubi: Challenge hardware

    Note over User, Yubi: Hardware Interaction
    Yubi-->>User: Flash LED (Waiting for touch)
    User->>Yubi: Touch Sensor

    Yubi->>Yubi: Sign challenge internally
    Yubi-->>Agent: Return signature
    Agent-->>App: Pass signature

    App->>Server: Send signed challenge
    Server->>Server: Verify against Public Key

    alt Success
        Server-->>App: Access Granted
        App-->>User: Shell Opened
    else Failure
        Server-->>App: Permission Denied
    end
To make the magic happen, you first have to have OpenSSH Client available in Windows.
OpenSSH for Windows
OpenSSH for Windows is Microsoft’s native port of the OpenSSH toolchain integrated into the Windows networking stack, providing SSH client/server functionality through Windows services and the Win32-OpenSSH subsystem. It uses the same cryptographic protocols as upstream OpenSSH (e.g., ED25519 / RSA keys, public-key authentication, SSH agents) while interfacing with Windows components such as the Windows Service Manager, NTFS permissions, and the Windows credential environment.
YubiKey and Windows Hello Integration
A YubiKey can integrate with Windows Hello through the FIDO2 / WebAuthn stack or smart-card/PIV mode, enabling hardware-backed authentication tied to the Windows security subsystem. In this model, Windows Hello acts as the local user verification layer (PIN / biometric) while the YubiKey performs cryptographic signing using its secure element, allowing passwordless or multi-factor authentication for Windows logon, enterprise identity providers, and SSH/FIDO2 authentication flows.
Preparing your Windows 11 environment
Removing Legacy OpenSSH
Using DISM to clear old system versions. If an older version of OpenSSH is installed, you can use DISM (Deployment Image Servicing and Management) or its Remove-WindowsCapability cmdlet, to remove OpenSSH Client.
Use one of the following commands:
dism.exe /online /Remove-Capability /CapabilityName:OpenSSH.Client~~~~0.0.1.0Remove-WindowsCapability -Online -Name OpenSSH.Client~~~~0.0.1.0About Remove-WindowsCapability:
Uninstalls a Windows capability package from an image.
Replace “Client” with “Server” to remove a previous installed OpenSSH Server:
dism.exe /online /Remove-Capability /CapabilityName:OpenSSH.Server~~~~0.0.1.0Remove-WindowsCapability -Online -Name OpenSSH.Server~~~~0.0.1.0After successful removal you can directly start with a new installation.
Installing the Modern OpenSSH Client (.msi)
Below you install the OpenSSH Client software, not server. See install OpenSSH in Windows Server for the server software.
Installing OpenSSH Client is pretty straightforward, but there are some caveats you need to be aware of. For example, earlier installed versions of OpenSSH.
First make sure no earlier versions of OpenSSH are installed on your system, for example when you used Dism, Add-WindowsCapability or installed OpenSSH manually. If a version is installed, remove it first or it will conflict.
Second, download the OpenSSH-Win64-v8.9.1.0.msi Windows Installer file from https://github.com/PowerShell/Win32-OpenSSH/releases. Note you must have at least version V8.9.1.0p1-Beta. You can install this .msi file in two ways:
- double clicking the Windows Installer file from within Windows Explorer
msiexecfrom the (cmd / PowerShell) command line
The latter has our preference, additional steps are required if you install ssh by double clicking the installer file. If you have installed by double clicking, see Configure Path Environment section for more steps.
The OpenSSH .msi Windows Installer file can install both ssh Server and Client (the default), and only Server or only Client. We want that last one, and the command line option is ADDLOCAL=Client. By default, msiexec.exe doesn’t add the installation path to your system’s $env:path environment variable. For this, add ADD_PATH=1 to the command.
This makes the full command to install OpenSSH Client on your system (in one line):
Start-Process `
	-NoNewWindow msiexec.exe `
	-ArgumentList "/i <full_path_to>\OpenSSH-Win64-v8.9.1.0.msi ADDLOCAL=Client ADD_PATH=1" `
	-Wait
OpenSSH is a perfect tool for your Windows 11 and WSL 2 DevOps environment.
Installing using WinGet
Use the following one-liner to install OpenSSH Client with WinGet, this uses the --override flag to pass an argument directly to the installer:
winget install Microsoft.OpenSSH.Preview --override ADDLOCAL=ClientIf needed you can lookup the correct Id using winget search OpenSSH.
Configuring System PATH
This is only required if you have double clicked the installation .msi file.
If you don’t want to type out the full path to the ssh.exe executable file (C:\Program Files\OpenSSH\ssh.exe) constantly, add the directory to your System or User PATH environment variable. On multi-user systems, modifying the System PATH environment is recommended.
Update PATH using PowerShell
As Administrator:
[Environment]::SetEnvironmentVariable( `
	"Path", [Environment]::GetEnvironmentVariable( `
		"Path",[System.EnvironmentVariableTarget]::Machine `
	) + ';' + ${Env:ProgramFiles} + '\OpenSSH', `
	[System.EnvironmentVariableTarget]::Machine `
)
Manual user PATH edits & reboot
As an user you can execute:
[Environment]::SetEnvironmentVariable( `
	"Path", [Environment]::GetEnvironmentVariable( `
		"Path",[System.EnvironmentVariableTarget]::User `
	) + ';' + ${Env:ProgramFiles} + '\OpenSSH', `
	[System.EnvironmentVariableTarget]::User `
)
As you can see, these are complicated commands and therefor it’s best / easier to just install using msiexec.exe.
You must reboot or logout/login in order to have the new path environment variable available. I prefer to simply reboot. Continue with creating a key pair after rebooting and logging back in.
Verify the ssh-sk-helper middleware
Better safe than sorry, so verify the ssh-sk-helper.exe middleware is present:
PS > Test-Path "C:\Program Files\OpenSSH\ssh-sk-helper.exe"
True
Verify OpenSSH Authentication Agent
While you are at it, verify the OpenSSH Authentication Agent is running:
PS > Get-Service -Name "ssh-agent"

Status   Name               DisplayName
------   ----               -----------
Running  ssh-agent          OpenSSH Authentication Agent
Implementation: Generating Your Security Keys (SK)
Generating Standard Security Keys
Now it’s (finally) time to generate your Security Key (sk) key pairs. Of course you have more than one YubiKey, so you always have a back-up.
Here is how:
- Enter one YubiKey into your USB-C drive. You’ll notice the ‘Y’ logo to light up and start flickering for a second.
- Execute the following command in PowerShell (or cmd.exe), replacing the placeholders ‘username’ and ‘yubikeynumber’ with their respective values. For convenience, I name my keys containing the YubiKey number and creation date.
# all in one line
ssh-keygen.exe
	-t ecdsa-sk
	-C "username-$((Get-Date).ToString('MM-dd-yyyy'))-yubikeynumber"
	-f .ssh/id_ecdsa_sk-yubikeynumber
Use -t ed25519-sk with ssh-keygen.exe to generate an ED25519 security key. Ed25519 is a high-performance, secure digital signature algorithm (EdDSA) using Curve25519, offering 128-bit security with 32-byte private keys and 64-byte signatures. It is designed for speed, efficiency, and resistance to side-channel attacks, making it a modern standard for SSH keys, blockchain, and TLS.
The Elliptic Curve Digital Signature Algorithm (ECDSA) is a cryptographic algorithm used to create digital signatures, ensuring data integrity and authenticity using public-key cryptography based on elliptic curves. It provides high security with smaller key sizes compared to RSA, making it efficient for blockchain (e.g., Bitcoin), secure messaging, and TLS/SSL certificates.
Follow the on-screen instructions and touch your YubiKey when requested.
- Switch YubiKey and execute this step again.
- Done
You’re all done.
-t ecdsa-sk explanation: In OpenSSH (version 8.2 and later), the -t ecdsa-sk and -t ed25519-sk options are used with the ssh-keygen command to create SSH keys that are physically backed by a FIDO2/U2F security key, such as a YubiKey.
The “-sk” suffix stands for Security Key. Unlike standard SSH keys that reside entirely on your computer’s hard drive, these keys require a physical hardware authenticator to function.
If you generate a key with verify-required, you are committing to typing a PIN and touching the key every single time you connect. You need to decide at the moment of key generation how strict you want this to be.
Resident keys
Resident keys (-O resident) in SSH – using FIDO2 keys like YubiKeys – store the private key directly on the hardware token rather than as a file on the computer. This enables portability, allowing users to move between machines and use ssh-keygen -K to download their keys without needing the original file.
Physical Presence: Managing the “Touch to Sign” requirement
Whenever you initiate an SSH connection, the YubiKey will start flashing. The authentication process will “pause” and wait for you to physically tap the metal contact on the key. This proves that a human is physically present and intends to perform the login. Even if a hacker has full remote control of your PC, they cannot “touch” the YubiKey. They are effectively locked out of your SSH sessions.
How OpenSSH handles this interaction is via “Options” (-O) during key generation:
- User Presence (UP): This is the default. It requires only a touch.
- User Verification (UV): This is enabled using
-O verify-required. It requires both a PIN (something you know) and a touch (something you have). This turns your SSH login into true Multi-Factor Authentication (MFA). - No-Touch (Advanced): Some users try to disable the touch requirement using
-O no-touch-required. However, most modern SSH servers (the ones you are connecting to) will reject the login if the “touch” flag is missing for a security key, so managing this usually means ensuring it is enabled correctly.
Local SSH config tweaks
Some tweaks to the stock ssh configuration file are required to ease sessions and authentication. Create or open up the .ssh\config file in notepad.exe:
notepad.exe "${env:USERPROFILE}\.ssh\config"Create the following section for your host:
Host bastionhost.example.com
HostbasedKeyTypes sk-ecdsa-sha2-nistp256@openssh.com,sk-ssh-ed25519@openssh.com
# Instead of HostbaseKeyTypes directive, you can also point to
# ssh identity files:
# IdentityFile c:/users/username/.ssh/id_ecdsa_sk-012345678
# IdentityFile c:/users/username/.ssh/id_ecdsa_sk-012345679
Compression yes
User username
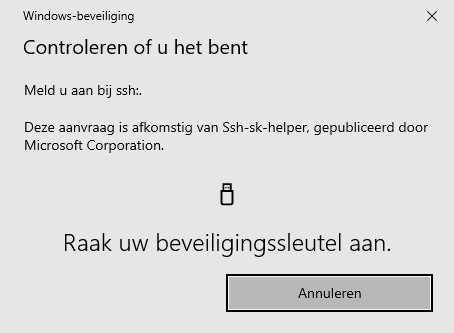
ForwardAgent yesNow when you type bastionhost.example.com into your PowerShell command-prompt, WinHello automatically opens a pop-up and asks you to touch your YubiKey.
Validation and troubleshooting
Final connection checks
As a final check, make sure the OpenSSH Authentication Agent service start-up type is set to Automatic and is currently running. It’s the #1 reason these setups fail on Windows!
Verify the OpenSSH authentication agent (ssh-agent)
The most common point of failure is a stopped service. Open PowerShell as Administrator and run:
Get-Service ssh-agent | Select-Object -Property Name, StartType, Status- Status must be
Running. - StartType should be
Automatic(so it survives a reboot).- Fix:
Set-Service -Name ssh-agent -StartupType Automatic; Start-Service ssh-agent
- Fix:
Confirm the key is “visible” to the agent
Plug in your YubiKey and run:
ssh-add -LYou should see a line ending in sk-ssh-ed25519@openssh.com (or ecdsa). If the list is empty, the agent isn’t seeing the hardware key. Try re-inserting the YubiKey or restarting the ssh-agent service.
Test with verbose output
If your connection hangs or asks for a password instead of a “touch,” use the verbose flag to see exactly what is happening:
ssh -v user@your-server-ipLook for these lines in the output:
debug1: offer sk-ssh-ed25519@openssh.com...(The client is offering the hardware key).debug1: expect SSH2_MSG_USERAUTH_PK_OK(The server recognizes the key).- Common “gotchas”
- The “Touch” Timeout: If you don’t touch the YubiKey within a few seconds, the connection will time out.
- PATH Issues: If
ssh-keygendoesn’t recognize the-sksuffix, your Windows is likely calling an older version of OpenSSH (like the one bundled with Git for Windows). Ensure the System32 OpenSSH folder is first in your System PATH. - Remote Permissions: Ensure your
~/.sshfolder on the server is700andauthorized_keysis600.
Note for WSL Users: If you are using these keys within Windows Subsystem for Linux (WSL), standard NTFS permissions won’t suffice. You’ll need to ensure your key permissions are strictly set (e.g., 600), or the client will reject them. Check out my guide on how to share OpenSSH keys with WSL in Windows to get the mount settings and permissions exactly right.
Conclusion
If you are looking to manage these keys at scale across an enterprise, check out my guide on storing SSH public keys in Active Directory.
Found this guide helpful? You can support my independent deep dives into Windows Server and DevOps by donating via PayPal. Every bit of support helps keep saotn.org fast and updated!
Microsoft Win32-OpenSSH finally supports FIDO / U2F devices such as a YubiKey! 🙂 This means you no longer have to rely on Git Bash alone (which is a great product btw), or Reza Tavakoli OpenSSH helper openssh-sk-winhello. Now you can have one tool, with one ssh version instead of two or sometimes even three.
In Windows Server you can also store SSH keys in Active Directory; key-based authentication in OpenSSH for Windows.
Key Takeaways
- Using YubiKey support in OpenSSH for Windows 11 enhances security by moving SSH keys from a file to a hardware device.
- This transition prevents credential theft, as it requires both the YubiKey and a user verification method like a PIN or biometric.
- Windows 11 now supports FIDO/U2F hardware authenticators, making setup easier and more secure for SSH authentication.
- Follow step-by-step instructions to install and configure OpenSSH and YubiKey, without needing additional tools.
- The article emphasizes the importance of backups and explains the advantages of hardware-backed keys over traditional file-based SSH keys.
By combining YubiKey hardware with Windows 11’s native OpenSSH, you’ve moved from a ‘possession-only’ (file) to a ‘possession + biometric/PIN’ (MFA) security model. This effectively nullifies the threat of leaked SSH keys.
3 thoughts on “YubiKey support in OpenSSH for Windows 11”